Introduction
There’s something undeniably delightful about the combination of cookies and cream, and when that classic flavor translates into cookies, the result is pure magic. These Cookies and Cream Cookies are not just your standard treats; they are a decadent homage to the iconic cookies and cream dessert. With a rich, chewy center and delightful chunks of cookies throughout, they are sure to please everyone in your household.
What makes these cookies so irresistible is the mix of chocolate and vanilla flavors, which play off one another beautifully. The creaminess of the filling and the crunch of Oreos create a delightful texture that keeps you coming back for more. Perfect for baking with friends or as a weekend treat, these cookies bring joy with every bite.
Ingredients
- 1 cup unsalted butter, softened
Butter is the foundation of any great cookie. It adds richness and contributes to the soft, chewy texture. Softened butter allows for better incorporation with sugars, ensuring a well-blended dough. - 1 cup granulated sugar
Sugar not only sweetens the cookies but also plays a crucial role in browning. The granulated sugar contributes to a crisp exterior while giving a soft interior. - 1 cup brown sugar, packed
Brown sugar adds moisture and a hint of caramel flavor to the cookies. The molasses in brown sugar also helps in achieving a chewier texture. - 2 large eggs
Eggs provide structure and stability to cookies. They help bind the ingredients while adding moisture, making for a tender dough. - 2 teaspoons vanilla extract
Vanilla extract enhances the overall flavor profile of the cookies, bringing warmth and depth that complement the chocolate. - 3 cups all-purpose flour
Flour is the main structural component of cookies. It creates the framework for the cookies to rise and hold their shape. - 1 teaspoon baking soda
Baking soda acts as a leavening agent, helping the cookies to rise and become light and fluffy. It also contributes to the overall texture. - 1/2 teaspoon salt
Salt is essential for balancing sweetness. It enhances the flavors, making the cookies taste more dynamic. - 1 cup crushed Oreo cookies
These are the star of the recipe, adding both flavor and texture. The crunchy cookie bits offer a delightful contrast to the soft dough. - 1/2 cup chocolate chips (optional)
Chocolate chips can be added for extra chocolate flavor and gooeyness, enhancing the overall indulgence of the cookies.
Directions & Preparation
Step 1: Preheat your oven to 350°F (175°C).
Preheating the oven is essential for ensuring even baking. A properly heated oven helps the cookies rise correctly and attain a golden-brown color. Waiting for the oven to reach the right temperature before placing the cookies inside will lead to consistent results.
Step 2: In a large bowl, cream together softened butter, granulated sugar, and brown sugar until light and fluffy.
Creaming the butter with sugars is a crucial step that incorporates air into the mixture, resulting in a lighter cookie. Aim for a pale color and a fluffy texture. This process can take about 3–5 minutes, so don’t rush it.
Step 3: Add in eggs and vanilla extract, mixing until fully incorporated.
Incorporating the eggs one at a time ensures a smoother batter. The addition of vanilla at this stage enhances the flavor and intermingles beautifully with the butter and sugar mix—creating a cohesive dough.
Step 4: In another bowl, whisk together flour, baking soda, and salt.
Whisking the dry ingredients together ensures that the baking soda and salt are evenly distributed, preventing any lumps or pockets in the dough. This uniformity will lead to consistent results throughout the dough.
Step 5: Gradually add the dry ingredients to the wet ingredients, mixing until just combined.
Mixing the wet and dry ingredients should be done gently to prevent overmixing, which can make the cookies tough. It’s okay if the dough is a bit crumbly at this stage as the moisture will come from the additions.
Step 6: Fold in the crushed Oreo cookies and chocolate chips, if using.
Folding rather than stirring minimizes the risk of breaking down the Oreo pieces too much. You want visible chunks for texture and flavor distinction. Be generous with the Oreos; they are what make these cookies special.
Step 7: Scoop tablespoons of dough onto a baking sheet lined with parchment paper, spacing them about 2 inches apart.
Proper spacing is key to ensuring the cookies bake evenly without spreading into each other. Use a cookie scoop for consistent size, which will help in achieving even baking times and a uniform look.
Step 8: Bake for 10-12 minutes or until the edges are lightly browned.
Watching the edges is important; they will indicate doneness. The cookies will continue to cook a little after being removed, so it's okay if the centers appear slightly underbaked. This keeps them soft and chewy.
Step 9: Let the cookies cool on the baking sheet for 5 minutes, then transfer them to a wire rack to cool completely.
Cooling on the baking sheet allows the cookies to set before being moved. Once transferred to a wire rack, they will cool evenly and not become soggy from residual heat.

Dunking Delights: Pairing Your Cookies
For those who enjoy a touch of whimsy, try pairing these Cookies and Cream Cookies with a tall glass of cold milk. The creamy texture of the milk complements the crunchy bits of Oreo and soft dough beautifully, creating a delightful balance. Additionally, you might consider serving them with a scoop of vanilla ice cream for a delectable dessert experience that is reminiscent of that beloved cookies and cream ice cream flavor.
Creative Variations to Try
While this recipe celebrates the classic Cookies and Cream combination, you can experiment by incorporating different cookie types for a twist. Try mixing in crushed chocolate mint cookies for a refreshing flavor infusion or peanut butter cookies for a nutty contrast. Various chocolates or even nut pieces can be added for an extra crunch, allowing your creativity to shine through in each batch.
The Science Behind Chewy Cookies
Achieving a perfect chewy texture is often a quest for bakers. Key components, like the balance of butter to flour and the types of sugars used, significantly influence the consistency. The moisture retained by brown sugar, combined with the right baking times, creates the signature chewy delight that defines these cookies. Understanding this science not only helps replicate this recipe but opens avenues for experimenting in future baking endeavors.
FAQs
What can I use instead of Oreos in this recipe?
You can substitute Oreos with any chocolate sandwich cookie, such as chocolate mint or peanut butter-filled cookies. Just be mindful that different flavors may alter the final taste.
Why did my cookies turn out too thick?
If your cookies are too thick, it could be due to too much flour being added. Ensure you're measuring flour correctly by spooning it into the measuring cup and leveling it off. Also, consider chilling the dough slightly before baking to help with shape.
How can I make my cookies less sweet?
To reduce sweetness, you can decrease the amount of sugar in the recipe, but keep in mind that it may also alter the cookie's texture. Alternatively, use dark chocolate chunks instead of milk chocolate to balance sweetness.
Why did my cookies spread too much?
Excessively spreading cookies can be a result of melted butter used instead of softened butter or baking the cookies on a warm baking sheet. Make sure butter is at room temperature and use a cool sheet for baking.
Can I use a gluten-free flour blend?
Yes, a 1:1 gluten-free flour blend can be used in place of all-purpose flour. Look for one that contains xanthan gum, as it can help with the texture.
What if my cookie dough is too crumbly?
If your dough is too crumbly, it's likely due to insufficient moisture. Add a teaspoon of milk or water slowly until the dough comes together without being wet.
How can I make my cookies more chocolatey?
For an extra chocolaty flavor, increase the amount of chocolate chips or add cocoa powder to the flour mixture. Keep the ratio balanced to avoid altering the texture.
What’s the best way to enjoy these cookies?
For an enhanced experience, warm the cookies slightly for a gooey center. They are perfect with a glass of milk or alongside a scoop of ice cream.
Conclusion
Baking these Cookies and Cream Cookies is not only a rewarding experience, but it also brings joy to those who indulge in them. Each bite is a fusion of chocolatey goodness and creamy delights that evoke nostalgic memories of childhood treats. Whether you're enjoying them fresh from the oven or sharing them at gatherings, they are sure to be a hit.
As you explore this recipe, don’t hesitate to make it your own. Every kitchen adventure teaches you more about baking, flavors, and textures, encouraging you to innovate. So gather your ingredients, channel your inner baker, and relish the joy of creating your own batch of Cookies and Cream Cookies.
Recipe Card
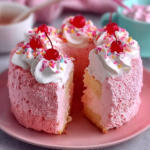
Delightful Pink Angel Food Cake for Special Occasions
Ingredients
- 1 cup cake flour
- 1 cup granulated sugar divided
- 12 large egg whites about 1½ cups
- 1 tsp cream of tartar
- 1 tsp vanilla extract
- 1/2 cup strawberry puree
- Pinch of salt
Instructions
- Preheat the oven to 350°F (175°C).
- Sift together the cake flour and half of the sugar (½ cup) into a bowl.
- In a separate mixing bowl, whip egg whites until foamy, then add cream of tartar and salt.
- Continue beating the egg whites until soft peaks form, then gradually add the remaining sugar.
- Beat the egg whites until stiff peaks form, then add vanilla and strawberry puree.
- Gently fold the flour mixture into the egg whites in three additions.
- Pour the batter into an ungreased angel food cake pan, smoothing the top.
- Bake for 35-40 minutes, or until the cake is golden brown and springs back when touched.
- Immediately invert the pan to cool. Allow to cool completely before removing from the pan.
- Once cool, gently run a knife around the edges and invert to release the cake.
- Slice and serve plain or with fresh whipped cream and berries, if desired.
Notes
Additional serving suggestions: pair with a crisp salad, garlic bread, or roasted seasonal vegetables for balance.
For make-ahead, prep components separately and assemble just before heating to preserve texture.
Taste and adjust with acid (lemon/vinegar) and salt right at the end to wake up flavors.