Introduction
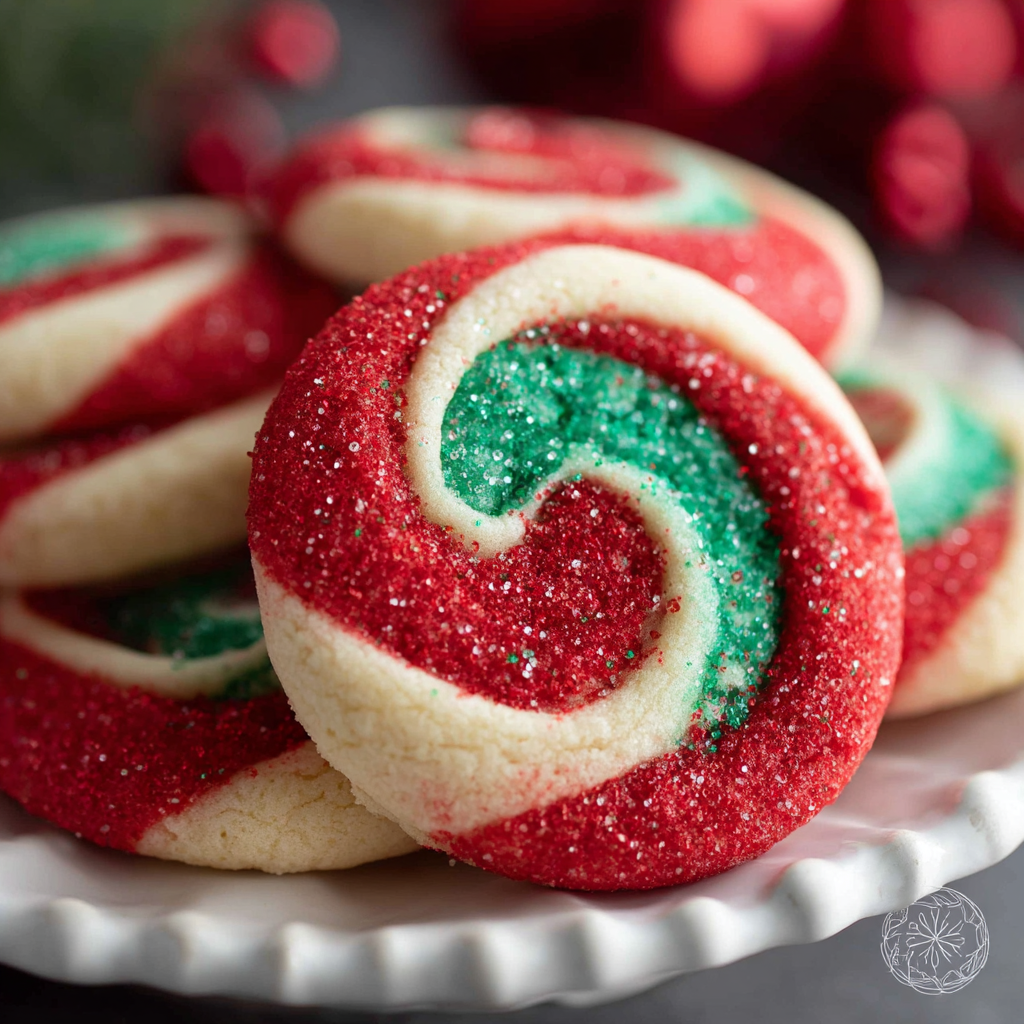
Christmas Pinwheel Cookies are a festive treat that can bring the charm of the holidays right into your kitchen. Their vibrant colors and swirls beckon you to take a bite and enjoy the flavors of the season. These delightful cookies not only taste great but also double as a wonderful decoration on your holiday dessert table.
Making Pinwheel Cookies is an engaging activity for both seasoned bakers and beginners alike. The process allows for creativity, as you can vary the colors and flavors according to your preferences. Whether you want to impress your guests or treat your family, these cookies will leave a lasting impression.
Ingredients
- 2 cups all-purpose flour
Flour provides structure to the cookies. It enables them to hold their shape while baking, contributing to the overall texture and firmness. Using all-purpose flour gives a good balance between tenderness and chewiness. - 1 cup unsalted butter, softened
Butter adds richness and flavor, helping to create a soft and tender crumb. The fat in butter helps the cookies retain moisture, ensuring they remain tender even days after baking. - 1 cup granulated sugar
Sugar not only sweetens the cookies but plays a crucial role in the browning and crisping of their edges. It helps create a delightful texture and a slight chewiness that balances the cookie's softness. - 1 large egg
Eggs act as a binder, holding all the ingredients together. They also add moisture and contribute to the cookies' structure and richness, enhancing the overall flavor. - 1 teaspoon vanilla extract
Vanilla extract adds a warm, sweet aroma that complements the other flavors in the cookies. It enhances the depth of flavor, making each bite even more delicious. - 1/2 teaspoon salt
Salt amplifies sweetness and enhances the overall flavor of the cookies. It also helps to balance the richness of the butter and sugar. - 1/4 cup cocoa powder
Cocoa powder provides a chocolate flavor and a dark color to half of the dough. This creates a beautiful contrast when rolled into pinwheels, adding depth to the visual appeal. - Red and green food coloring
Food coloring is optional but adds festive cheer to your cookies. It allows you to customize the colors based on your holiday theme, making your cookies more attractive.
Directions & Preparation
Step 1: Preheat the oven to 350°F (175°C).
Preheating the oven ensures that the cookies bake evenly. If you place dough in an unheated oven, it can spread before setting, leading to cookies with an undesired texture.
Step 2: In a large mixing bowl, cream together the softened butter and granulated sugar until light and fluffy.
Creaming butter and sugar properly incorporates air into the mixture, which helps achieve a light texture. A well-creamed mixture should look pale and fluffy, indicating it's ready for the next step.
Step 3: Add the egg and vanilla extract to the creamed mixture, combining until smooth.
Incorporating the egg and vanilla extracts at this stage allows for uniform mixing. The egg’s emulsifying properties help blend the fat and dry ingredients, creating a cohesive cookie dough.
Step 4: In a separate bowl, whisk together the flour, salt, and cocoa powder.
Whisking the dry ingredients together ensures even distribution of the cocoa powder and salt, preventing pockets of flavor or textural inconsistencies in the final cookies.
Step 5: Gradually add the dry ingredients to the wet mixture, mixing until just combined.
Mixing until just combined prevents overworking the dough, which can lead to tougher cookies. Stir gently to maintain a soft texture, keeping an eye on the color as it begins to transform.
Step 6: Divide the dough in half. Add cocoa powder to one half and food coloring to the other if desired. Mix until evenly colored.
Creating two distinct doughs is essential for the pinwheel effect. The cocoa-flavored dough will create contrast, while food coloring adds festive appeal. Ensure the colors are uniform for visual consistency.
Step 7: Roll out each half of the dough separately between sheets of parchment paper into rectangles about 1/4 inch thick.
Rolling the dough between parchment prevents sticking and cleanup issues. Aim for even thickness to ensure even baking. You can keep the dough chilled between rolls to make handling easier.
Step 8: Place one dough layer on top of the other, press gently, and then roll them up tightly in the parchment paper.
Rolling the two doughs together creates the iconic pinwheel design. Be sure to roll tightly to prevent gaps and ensure the cookie maintains its beautiful swirled pattern during baking.
Step 9: Wrap the rolled dough in plastic wrap and refrigerate for at least 30 minutes or until firm.
Chilling the dough allows the butter to solidify again, making it easier to slice. It also helps the cookies retain their shape in the oven, resulting in crisp edges.
Step 10: Slice the chilled dough into 1/4 inch thick pieces and place on a baking sheet lined with parchment paper.
Slicing the dough evenly ensures uniform baking. Use a sharp knife for clean cuts, and allow space between cookies as they will spread slightly when baking.
Step 11: Bake in the preheated oven for 10–12 minutes, or until the edges start to get a golden color.
Baking until the edges are golden gives a hint of crispness, while the centers will remain soft. Keep an eye on the cookies, as oven temperatures can vary.
Step 12: Allow the cookies to cool on the sheet for a few minutes before transferring them to a wire rack.
Cooling on the sheet helps set the shape and makes it easier to transfer without breaking. A wire rack allows air to circulate around the cookies for even cooling, preventing sogginess.

Creative Fillings and Flavors
While the typical version of Christmas Pinwheel Cookies features a classic vanilla and cocoa flavor, you can easily customize fillings. Consider adding a layer of jam, nut butter, or even crushed peppermint for a twist. These additions can enhance the flavor profile and make your cookies even more festive.
The Art of Rolling
Achieving a perfect swirl in your pinwheel cookies is all about rolling. Use a light touch to create an even thickness throughout the dough. If it cracks, simply patch it up; this is part of the charm of homemade cookies. Practice makes perfect, and each roll will get better.
Decorating Your Cookies
Once the cookies are baked and cooled, you can elevate their holiday charm with simple decorations. Drizzle melted chocolate, sprinkle with colored sugar, or use icing to create beautiful designs. Personalizing each cookie not only enhances their visual appeal but also makes baking a more enjoyable experience.
FAQs
Why did my pinwheel cookies spread too much?
Overmixing the dough or not chilling it adequately can cause excessive spreading. Make sure to chill the rolled dough long enough before slicing.
What if my dough is too thick to roll out?
If your dough is too thick, it may be overfloured. Add a small splash of milk to help bind it together, or let it rest at room temperature for a few minutes before rolling.
Can I use other colors instead of red and green food coloring?
Absolutely! You can use any colors that fit your holiday theme or personal preference. Experiment with vibrant shades for fun, decorative effects.
What can I do if the cookies taste bland?
If the cookies are bland, consider checking the amount of salt and vanilla. A pinch more salt or a touch of extra vanilla can significantly enhance flavors.
Can I swap the cocoa powder for another ingredient?
Yes! You can replace cocoa powder with additional flour for a vanilla-only version or experiment with flavored powders like matcha or fruit powders.
Why are my cookies soft and chewy when they should be crisp?
Overmixing can lead to cookies that are soft. Additionally, baking them for too short a time can prevent them from achieving a crisp texture.
Conclusion
Christmas Pinwheel Cookies are a delightful addition to any holiday celebration. Their beautiful appearance and customizable flavors make them a fantastic project for home bakers. With a little creativity and patience, you can create stunning treats that your family and friends will cherish.
As you enjoy baking these cookies, remember that the process is just as rewarding as the delicious results. Share them with loved ones, and make joyous memories as you savor the flavors of the holiday season.
Recipe Card

Delicious Christmas Pinwheel Cookies for the Holidays
Ingredients
- 2 cups all-purpose flour
- 1 cup unsalted butter softened
- 1 cup granulated sugar
- 1 large egg
- 1 teaspoon vanilla extract
- 1/2 teaspoon salt
- 1/4 cup cocoa powder
- Red and green food coloring
Instructions
- Preheat the oven to 350°F (175°C).
- In a large mixing bowl, cream together the softened butter and granulated sugar until light and fluffy.
- Add the egg and vanilla extract to the creamed mixture, combining until smooth.
- In a separate bowl, whisk together the flour, salt, and cocoa powder.
- Gradually add the dry ingredients to the wet mixture, mixing until just combined.
- Divide the dough in half. Add cocoa powder to one half and food coloring to the other if desired. Mix until evenly colored.
- Roll out each half of the dough separately between sheets of parchment paper into rectangles about 1/4 inch thick.
- Place one dough layer on top of the other, press gently, and then roll them up tightly in the parchment paper.
- Wrap the rolled dough in plastic wrap and refrigerate for at least 30 minutes or until firm.
- Slice the chilled dough into 1/4 inch thick pieces and place on a baking sheet lined with parchment paper.
- Bake in the preheated oven for 10–12 minutes, or until the edges start to get a golden color.
- Allow the cookies to cool on the sheet for a few minutes before transferring them to a wire rack.
Notes
Additional serving suggestions: pair with a crisp salad, garlic bread, or roasted seasonal vegetables for balance.
For make-ahead, prep components separately and assemble just before heating to preserve texture.
Taste and adjust with acid (lemon/vinegar) and salt right at the end to wake up flavors.