Introduction
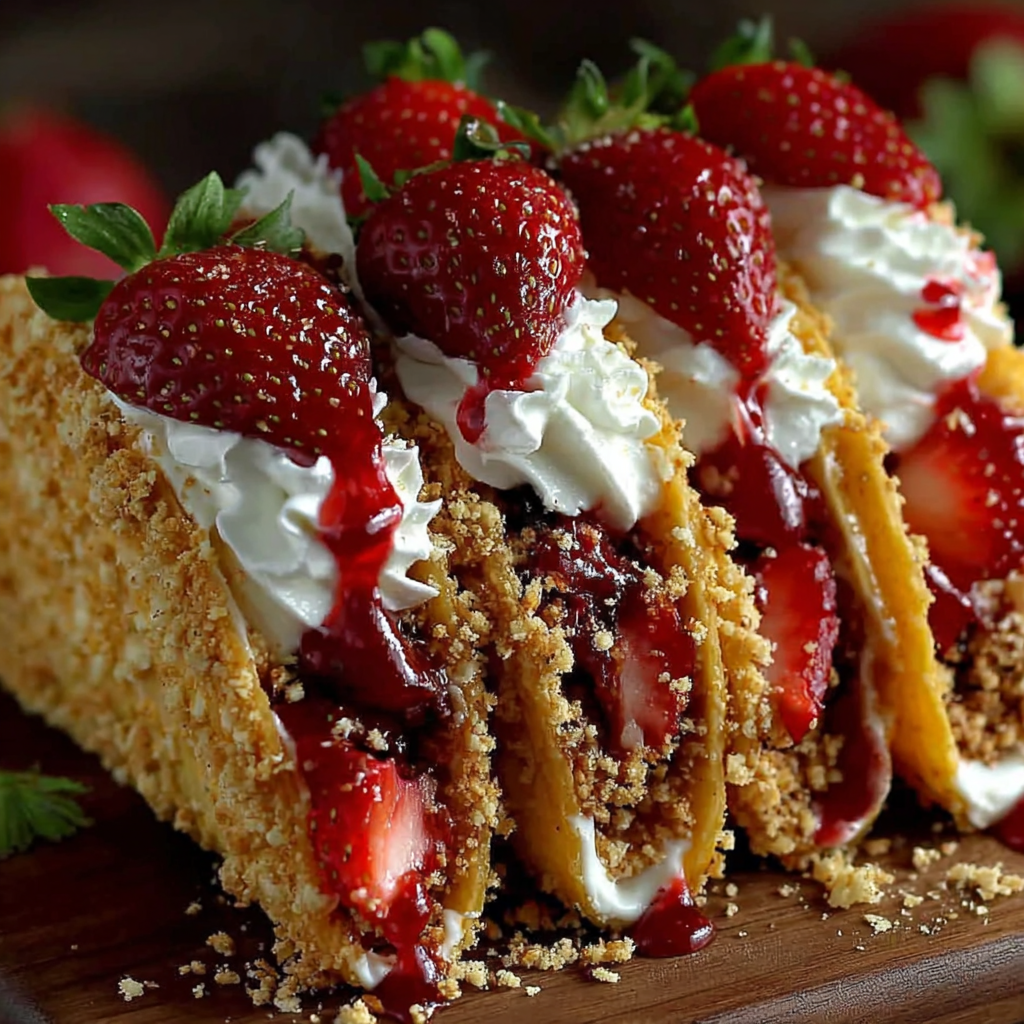
Strawberry Crunch Cheesecake Tacos are a delightful twist on classic desserts that combine the creamy goodness of cheesecake with the fun, portable shape of a taco. This unique recipe merges sweet strawberries and rich cheesecake filling into crunchy taco shells, making them a perfect treat for parties or casual get-togethers.
The vibrant colors and flavors of these tacos not only entice your taste buds but also provide an appealing dish to serve. With their sweet strawberry topping and crunchy texture, they are sure to impress family and friends alike. Whether you’re a seasoned cook or just starting out, you’ll enjoy creating these delicious bites.
Ingredients

- 1 cup graham cracker crumbs
Graham cracker crumbs form the base of the taco shell, providing a sweet and crunchy texture that mimics traditional taco shells. They also add a hint of buttery flavor that complements the cheesecake filling. - 1/2 cup unsalted butter, melted
Melted butter is vital for binding the graham cracker crumbs together, allowing the shell to hold its shape. It also adds richness and moisture, enhancing the overall flavor of the taco shells. - 2 cups cream cheese, softened
Cream cheese is the star of the cheesecake filling, offering a luscious, creamy texture and a tangy flavor that perfectly balances the sweetness of the strawberries. - 1 cup powdered sugar
Powdered sugar sweetens the cream cheese filling, making it beautifully smooth and creamy. It dissolves quickly, ensuring a consistent texture without any graininess in the filling. - 1 teaspoon vanilla extract
Vanilla extract intensifies the flavors of the filling, providing a warm, sweet aroma that enhances the overall dessert experience. It adds depth to the cream cheese mixture. - 2 cups fresh strawberries, sliced
Fresh strawberries are the quintessential topping for these tacos, adding a burst of natural sweetness and a vibrant color. They also provide a refreshing contrast to the creamy filling. - 1 cup whipped cream
Whipped cream adds a light, airy texture to the tacos, making them feel indulgent without being overly heavy. It also visually enhances the presentation of the dessert. - 1/2 cup crunchy topping (e.g., crushed nuts or toffee bits)
The crunchy topping adds an element of texture that elevates the dish. It contrasts beautifully with the softness of the filling and strawberries, providing a satisfying crunch in every bite.
Directions & Preparation
Step 1: Preheat the oven to 350°F (175°C).
Preheating the oven is crucial for ensuring that the taco shells bake evenly and achieve the right crunch. An adequately heated oven helps to set the structure of the shells while they bake for about 10-12 minutes.
Step 2: In a mixing bowl, combine graham cracker crumbs and melted butter.
Mixing the graham cracker crumbs with melted butter is essential to creating a cohesive mixture that will hold together well once baked. Ensure that all crumbs are coated for a consistent texture in the finished taco shells.
Step 3: Shape the mixture into taco shells using a muffin tin.
Spoon the graham cracker mixture into the muffin tin, pressing it firmly to create a shell shape. This method ensures that the shells maintain their form during baking, leading to beautifully crafted taco shells with an appealing shape.
Step 4: Bake the shells for 10-12 minutes or until golden.
Baking the shells causes them to harden and become crunchy, crucial for the overall texture of the taco. Keep a close eye on them; once they turn golden brown, remove them from the oven to avoid burning.
Step 5: Allow the shells to cool completely.
Cooling the taco shells is necessary for them to firm up and become easier to fill. This step prevents the filling from melting and helps maintain the crunchy exterior when the tacos are assembled.
Step 6: Beat together the cream cheese, powdered sugar, and vanilla extract until smooth.
Mixing the filling until smooth is vital for achieving the desired creamy texture. This step ensures that the ingredients are well incorporated, preventing any lumps from forming in the cheesecake filling.
Step 7: Gently fold in the whipped cream to the cream cheese mixture.
Folding in the whipped cream adds lightness to the filling without deflating it. This technique is key to maintaining a fluffy texture while achieving a sweet, creamy consistency that complements the taco shell.
Step 8: Fill the cooled taco shells with the cheesecake filling.
Filling the shells directly after they have cooled allows the flavors of the cream cheese mixture to shine. Take your time to avoid overfilling, which can lead to messy tacos and a less enjoyable eating experience.
Step 9: Top with sliced strawberries and crunchy topping.
Adding strawberries and the crunchy topping at the end not only enhances the visual appeal of your tacos but also provides contrasting textures and flavors. This step is the crown jewel, adding freshness and delightful crunch to the overall treat.
Step 10: Chill in the refrigerator for at least 30 minutes before serving.
Chilling the assembled tacos allows the flavors to meld and the filling to firm up, making them easier to eat. This resting time builds a delightful texture that will impress anyone who takes a bite.
Crafting the Perfect Taco Shell
Creating a solid yet crunchy taco shell is fundamental to the success of Strawberry Crunch Cheesecake Tacos. The key lies in the ratio of graham cracker crumbs to butter; too little butter may cause the shells to crumble, while too much can lead to greasiness. Taking care to press the mixture into the muffin tin tightly ensures they hold their shape during baking, giving you the perfect vessel for your delicious filling.
Balancing Flavors in the Filling
The cream cheese filling serves as the heart of your Strawberry Crunch Cheesecake Tacos. The balance between the tang of the cream cheese and the sweetness of the powdered sugar is essential for a harmonious flavor profile. Incorporating vanilla extract enhances the experience, while the addition of whipped cream aerates the mixture, creating a light, fluffy texture. Each component thoughtfully contributes to a filling that feels indulgent yet refreshing.
Enhancing Texture with Toppings
The texture in Strawberry Crunch Cheesecake Tacos is what makes them truly special. A crunchy topping, whether crushed nuts, toffee bits, or even granola, provides a delightful contrast to the creamy filling and soft strawberries. This contrast elevates each bite, inviting you to savor the complexity of textures. Choose your toppings based on personal preference and get creative; the possibilities are endless!
FAQs
What if my taco shells are too soft?
If your taco shells are too soft, it may be due to not baking long enough. Ensure they are golden brown and fully set before removing from the oven to achieve the right crispiness.
Can I use frozen strawberries for this recipe?
Yes, you can use frozen strawberries, but make sure to thaw and drain them well to avoid excess moisture in the tacos. Fresh strawberries offer a better texture, but frozen work in a pinch.
What should I do if the cream cheese filling is too thick?
If the cream cheese filling is too thick, try adding a tablespoon of milk to reach your desired consistency. Mix it in gradually until the filling is smooth and easily spreadable.
Can I double the recipe for a larger gathering?
Yes, you can easily double the recipe. Just ensure you use a larger muffin tin or multiple tins to bake enough shells, and keep an eye on the baking time as it may vary slightly.
How can I make the shells more flavorful?
For a deeper flavor, consider adding a pinch of cinnamon or cocoa powder to the graham cracker mixture. This will enhance the taste of the shells, giving an extra layer of deliciousness.
Is there a way to make the filling less sweet?
If you prefer a less sweet filling, you can reduce the amount of powdered sugar to suit your taste. Start with half a cup and taste as you go to ensure it meets your preference.
What can I do if my strawberries are not sweet enough?
If your strawberries are a bit tart, consider tossing them with a small amount of sugar and letting them sit for about 10-15 minutes. This will help draw out some of their juices and enhance their sweetness.
Conclusion
Strawberry Crunch Cheesecake Tacos bring an exciting twist to dessert that encapsulates the sweetness of strawberries and the richness of cheesecake in a fun, portable format. The combination of textures and flavors will delight your guests and elevate any occasion.
Whether for a festive gathering or simply a sweet treat at home, these tacos are sure to become a favorite. Enjoy creating and sharing this unique dessert that basks in both visual and flavorful appeal.
Recipe Card

Delicious Strawberry Crunch Cheesecake Tacos Recipe
Ingredients
- 1 cup graham cracker crumbs
- 1/2 cup unsalted butter melted
- 2 cups cream cheese softened
- 1 cup powdered sugar
- 1 teaspoon vanilla extract
- 2 cups fresh strawberries sliced
- 1 cup whipped cream
- 1/2 cup crunchy topping e.g., crushed nuts or toffee bits
Instructions
- Preheat the oven to 350°F (175°C).
- In a mixing bowl, combine graham cracker crumbs and melted butter.
- Shape the mixture into taco shells using a muffin tin.
- Bake the shells for 10-12 minutes or until golden.
- Allow the shells to cool completely.
- Beat together the cream cheese, powdered sugar, and vanilla extract until smooth.
- Gently fold in the whipped cream to the cream cheese mixture.
- Fill the cooled taco shells with the cheesecake filling.
- Top with sliced strawberries and crunchy topping.
- Chill in the refrigerator for at least 30 minutes before serving.
Notes
Additional serving suggestions: pair with a crisp salad, garlic bread, or roasted seasonal vegetables for balance.
For make-ahead, prep components separately and assemble just before heating to preserve texture.
Taste and adjust with acid (lemon/vinegar) and salt right at the end to wake up flavors.