Introduction
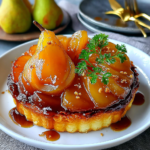
A pear tart is the perfect dessert for showcasing the subtle sweetness and delicate flavor of ripe pears. Simple to make yet impressive, this tart will elevate any gathering. With a buttery pastry and luscious filling, it serves as a delightful end to a meal or a sweet treat alongside tea or coffee.
This easy pear tart recipe utilizes fresh pears, which caramelize beautifully during baking, enhancing their natural sweetness. The combination of a flaky pastry and aromatic spices creates a dessert that's not just comforting but also sophisticated. Perfect for both beginner and experienced bakers, this tart is sure to become a seasonal favorite.
Ingredients
- 1 ½ cups all-purpose flour
All-purpose flour is the backbone of the tart crust, giving it structure and a light texture after baking. It forms the gluten necessary for creating a flaky pastry. - ½ cup unsalted butter, chilled and cubed
Butter adds richness and flavor to the crust, while also contributing to its flaky texture. Using chilled butter helps prevent the dough from melting too quickly, resulting in a tender pastry. - ¼ cup granulated sugar
Sugar sweetens the pastry and helps create a golden-brown crust as it caramelizes in the oven, enhancing flavor without overpowering the tart. - 1 large egg yolk
The egg yolk enriches the dough, adding moisture and helping to bind the ingredients together, providing a lovely texture to the crust. - 2 to 3 ripe pears, peeled, cored, and thinly sliced
Fresh pears are the star of this tart! When baked, they soften and release their juices, mingling with sugars to create a beautiful filling that is both sweet and aromatic. - 1 teaspoon vanilla extract
Vanilla adds a warm, sweet flavor that complements the pears and rounds out the tart's overall taste profile. - ½ teaspoon ground cinnamon
Cinnamon introduces warmth and depth, enhancing the pear flavor and making the tart feel cozy and inviting. - ¼ cup heavy cream
Heavy cream adds richness to the pear filling and helps in achieving a creamy consistency, balancing the natural sweetness of the fruit. - Powdered sugar for dusting (optional)
Powdered sugar can be sprinkled on the finished tart for a touch of elegance, subtly enhancing its presentation without adding overwhelming sweetness.
Directions & Preparation
Step 1: Preheat the oven to 375°F (190°C).
Preheating ensures that your oven reaches an optimal temperature before the tart goes in. This sets the stage for an evenly cooked crust that is perfectly golden and crispy.
Step 2: In a large bowl, combine flour, sugar, and salt. Add the cubed butter and mix until crumbly.
Combining dry ingredients first ensures even distribution of sugar and salt throughout the flour. Mixing in the butter until crumbly creates the texture needed for a flaky crust.
Step 3: Stir in the egg yolk and enough cold water until dough holds together. Form into a disk and chill.
Incorporating the egg yolk enriches the dough, while adding cold water helps form a cohesive ball. Chilling the dough before rolling allows the gluten to relax, preventing shrinkage during baking.
Step 4: Roll out the chilled dough on a floured surface to fit a 9-inch tart pan.
Rolling the dough evenly is crucial for even baking. When fitting it into the tart pan, ensure that the edges are well-formed to prevent any leaks during baking.
Step 5: Arrange the sliced pears in the prepared crust, overlapping them attractively.
How you arrange the pears affects not only presentation but also cooking. Overlapping them ensures even cooking and enhances the aesthetic, creating a stunning centerpiece.
Step 6: In a bowl, whisk together vanilla, cinnamon, cream, and any remaining sugar. Pour over pears.
This step infuses the pears with flavor while ensuring they stay moist during baking. The cream mixture combines to create a luscious filling that binds the fruit together.
Step 7: Bake for 30-35 minutes, or until the pears are tender and the crust is golden brown.
Baking allows the tart to set and the flavors to meld. Keeping an eye on the color of the crust ensures it doesn’t over-brown, leading to a perfect, flaky texture.
Step 8: Remove from oven and let cool slightly before dusting with powdered sugar, if desired.
Cooling allows the filling to settle slightly and makes cutting easier. A dusting of powdered sugar adds a touch of sweetness and a lovely finish to your tart.

Creating the Perfect Tart Dough
The dough's texture is crucial for a successful pear tart. Use chilled ingredients and avoid overworking the dough to achieve a flaky crust. When rolling out, consider a light hand, applying gentle pressure to keep the layers intact. If your dough feels sticky, dusting with a little flour while rolling can help.
Choosing the Right Pears
Selecting the right type of pear significantly impacts the flavor of your tart. Look for ripe Bartlett or Bosc pears, which offer a balance of sweetness and firmness. Avoid overly soft pears, as they can become mushy when baked, compromising both taste and texture.
Serving Suggestions for Your Pear Tart
This pear tart shines when served warm. Consider pairing it with a dollop of whipped cream or a scoop of vanilla ice cream to enhance the dessert experience. For a sophisticated touch, drizzle caramel sauce over the slices before serving, adding yet another layer of flavor.
FAQs
What can I do if my tart crust crumbles while rolling?
If the crust crumbles, it may be too dry. You can add a teaspoon of cold water, knead lightly, and try rolling again. Ensure not to overwork the dough.
How can I adjust the sweetness of the tart if my pears are bland?
If your pears lack sweetness, consider adding a bit more sugar to the cream mixture before pouring it over the fruit. A touch of honey can also enhance the overall flavor.
What should I do if the pears are overcooked and mushy?
If the pears are overcooked, they may release too much moisture. In future bakes, reduce the baking time slightly and check the fruit for tenderness early to prevent this.
Can I use other fruits instead of pears?
Absolutely! Apples or peaches can be substituted, offering their unique flavors while requiring similar preparation and baking times.
Is there a gluten-free option for the tart crust?
For a gluten-free crust, consider using a mix of almond flour and coconut flour or store-bought gluten-free pastry mix, adjusting liquid as necessary.
What if I want to make mini pear tarts instead?
To make mini tarts, simply divide the dough into smaller portions and use a muffin tin or tartlet pans, reducing the baking time slightly.
Conclusion
This easy pear tart combines simplicity with elegance, making it an excellent choice for various occasions. Utilizing seasonal freshness and basic techniques ensures success every time you bake.
With just a few ingredients and straightforward steps, you can create a dessert that impresses guests and provides comfort during quieter moments at home. Enjoy the process and, most importantly, savor each bite!
Recipe Card
Deliciously Simple Pear Tart Recipe for Home Cooks
Ingredients
- 1 ½ cups all-purpose flour
- ½ cup unsalted butter chilled and cubed
- ¼ cup granulated sugar
- 1 large egg yolk
- 2 to 3 ripe pears peeled, cored, and thinly sliced
- 1 teaspoon vanilla extract
- ½ teaspoon ground cinnamon
- ¼ cup heavy cream
- Powdered sugar for dusting optional
Instructions
- Preheat the oven to 375°F (190°C).
- In a large bowl, combine flour, sugar, and salt. Add the cubed butter and mix until crumbly.
- Stir in the egg yolk and enough cold water until dough holds together. Form into a disk and chill.
- Roll out the chilled dough on a floured surface to fit a 9-inch tart pan.
- Arrange the sliced pears in the prepared crust, overlapping them attractively.
- In a bowl, whisk together vanilla, cinnamon, cream, and any remaining sugar. Pour over pears.
- Bake for 30-35 minutes, or until the pears are tender and the crust is golden brown.
- Remove from oven and let cool slightly before dusting with powdered sugar, if desired.
Notes
Additional serving suggestions: pair with a crisp salad, garlic bread, or roasted seasonal vegetables for balance.
For make-ahead, prep components separately and assemble just before heating to preserve texture.
Taste and adjust with acid (lemon/vinegar) and salt right at the end to wake up flavors.