Introduction
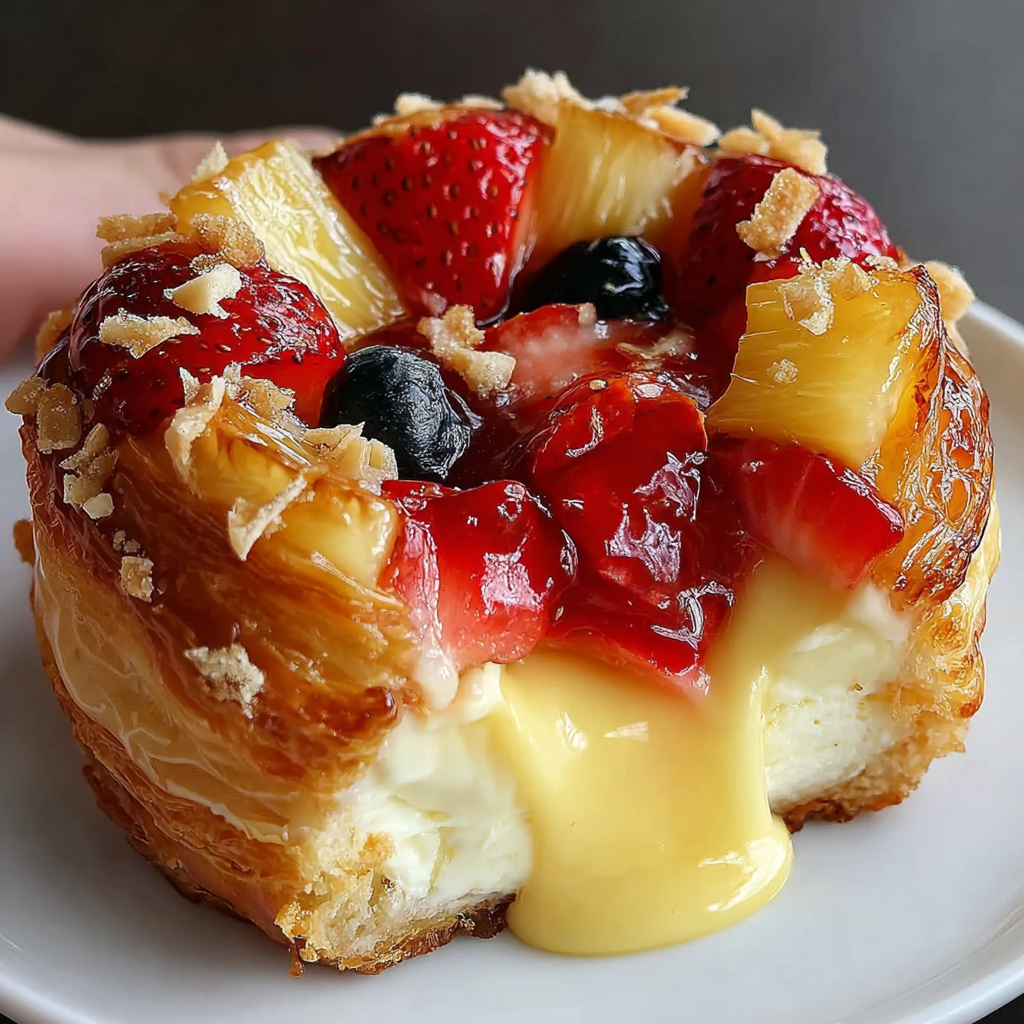
Imagine waking up to the aroma of fresh-baked pastries wafting through your home, specifically the sweet and tropical scent of a King Hawaiian Cheesecake Danish. This delicious treat combines the soft, fluffy texture of King Hawaiian bread with a rich and creamy cheesecake filling, making it an irresistible morning indulgence or a delightful dessert any time of day.
The warm, buttery layers of the Danish meld beautifully with the sweet and tart cream cheese mixture, creating a harmonious balance of flavors. Not only is this recipe a feast for the senses, but it also brings a touch of island-inspired comfort to your kitchen. Let’s dive into making this scrumptious treat!
Ingredients
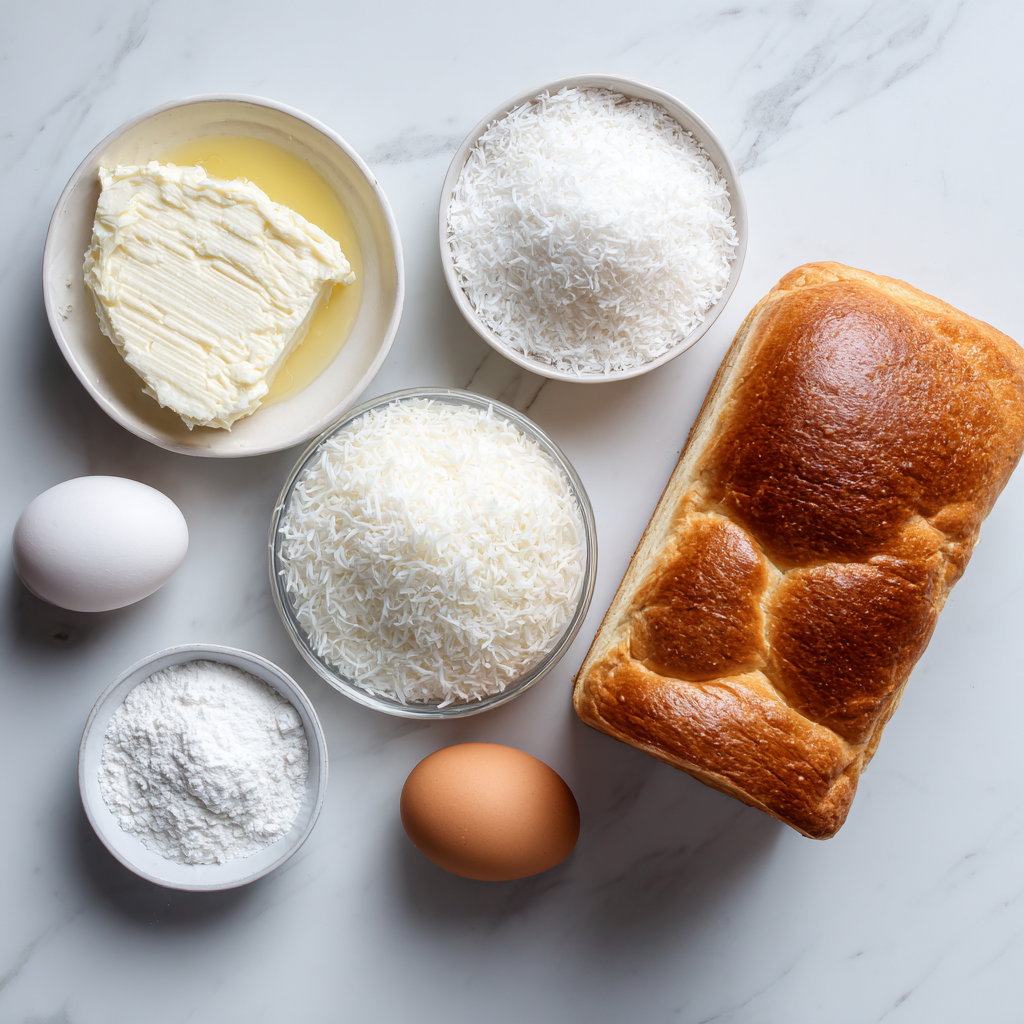
- 1 loaf King Hawaiian bread
This bread serves as the base for the Danish, providing a light and soft texture that enhances the pastry’s overall richness. Its slight sweetness complements the cream cheese filling perfectly. - 8 oz cream cheese, softened
Cream cheese is the primary ingredient in the cheesecake filling, contributing a velvety texture and rich flavor. Beating it until smooth ensures that the filling is creamy and easy to spread. - 1/2 cup granulated sugar
Sugar sweetens the cream cheese mixture and helps create a slight caramelization when baked, giving the pastry a beautiful golden color. It balances the tanginess of the cream cheese effectively. - 1 large egg
The egg acts as a binder in the filling, helping to create a cohesive texture. Beating it well incorporates air, which makes the filling light and fluffy as it bakes. - 1 teaspoon vanilla extract
Vanilla extract adds depth and warmth to the flavor profile, making the cheesecake filling more aromatic and appealing. Its subtle yet essential taste elevates the overall dessert. - 1/4 cup shredded coconut (optional)
Adding shredded coconut infuses a tropical flavor and texture to the Danish. It enhances the Hawaiian theme and provides a chewy contrast to the creamy filling. - 1 egg wash (1 egg beaten with 1 tbsp water)
The egg wash gives the Danish a beautiful, shiny finish once baked. It contributes to the appealing golden color, making the pastry visually enticing. - Powdered sugar for dusting (optional)
Helping to finish off the Danish, powdered sugar adds an extra touch of sweetness and visual appeal. A light dusting can make the dish look elegant without overwhelming the flavors.
Directions & Preparation
Step 1: Preheat your oven to 375°F (190°C).
Preheating the oven is crucial for even baking. It allows the Danish to rise properly and develop a beautiful golden-brown crust. Ensure your oven reaches the correct temperature before putting your pastry in.
Step 2: Prepare the cream cheese filling by beating together the cream cheese, sugar, egg, vanilla extract, and shredded coconut until smooth.
Properly mixing the cream cheese filling ensures it is homogenous with no lumps, creating a smooth, creamy texture. It’s also important to beat until air is incorporated to help the filling maintain lightness during baking.
Step 3: On a clean surface, slice the King Hawaiian bread horizontally into three even layers.
Slicing the bread allows for the layers to be filled with cheesecake filling, making a delightful layered effect. It’s important to make clean cuts to keep the layers intact for easy assembly.
Step 4: Spread an even layer of the cream cheese filling on the bottom layer of the bread, then place the second layer on top and repeat the process until all layers are filled.
By evenly distributing the filling, each bite of the Danish will be rich and flavorful. Ensure the layers are well aligned as this defines the final structure of the Danish.
Step 5: Place the final layer of bread on top and brush the entire surface with the egg wash.
The egg wash serves to give a beautiful golden sheen to the Danish and helps the layers hold together during baking. Ensure every part is coated for a uniform appearance.
Step 6: Transfer the layered Danish to a baking sheet lined with parchment paper.
Using parchment paper ensures easy cleanup and helps prevent sticking, allowing for a beautiful release of the pastry once baked. It is an essential step for perfect presentation.
Step 7: Bake in the preheated oven for 25-30 minutes, or until golden brown.
Baking at the right temperature for the correct time helps the Danish to rise, create a desirable texture, and caramelize the sugars. Keep an eye on it towards the end to avoid over-baking.
Step 8: Let the Danish cool for a few minutes before dusting with powdered sugar and serving.
Allowing the Danish to cool slightly helps set the filling and makes it easier to cut without the layers slipping apart. The powdered sugar adds a lovely finishing touch to your presentation.
The Magic of King Hawaiian Bread
King Hawaiian bread is known for its unique sweetness and incredibly soft texture, making it a perfect choice for a Danish. Its spongy nature absorbs flavors beautifully without becoming soggy, offering the right balance of fluffiness and substance. This sweetness pairs seamlessly with the rich cream cheese filling, creating a delightful bite that transports you straight to a tropical paradise.
Flavor Variations to Try
While the classic version of King Hawaiian Cheesecake Danish is undeniably delicious, experimenting with different flavors can add an exciting twist. Consider incorporating fresh fruits like pineapple or mango into the cream cheese filling for a more tropical flair. Alternatively, a sprinkle of cinnamon or nutmeg can give your Danish a warm, spiced profile that’s perfect for any season.
Perfecting the Cream Cheese Filling
The cream cheese filling is the heart of this Danish recipe, and getting it just right is essential. Make sure to use softened cream cheese to avoid lumps. Mixing the ingredients at room temperature helps achieve a smooth consistency. If you’re feeling adventurous, adding a splash of coconut cream can enhance the island flair, making every bite even more luscious.
FAQs
Can I reduce the sugar in the cheesecake filling?
Yes, you can adjust the sugar according to your taste. Just note that it may affect the sweetness level and overall creaminess.
What should I do if my Danish feels too doughy?
If the Danish seems too doughy, it might need a few more minutes in the oven. Look for a golden-brown color to indicate it’s fully baked.
Can I use a different type of bread for this recipe?
While King Hawaiian bread is ideal, you can substitute with brioche or another sweet, soft bread. Just ensure it has a similar texture.
Is it possible to make bite-sized portions instead of a large Danish?
Absolutely! You can cut the bread into smaller pieces and layer them individually. Adjust the baking time accordingly for smaller servings.
Why is my cream cheese filling too thick or heavy?
If the filling is too thick, it may need more mixing to incorporate air. Adding a tablespoon of milk can also help achieve a smoother consistency.
Can I add another flavor to the cheesecake filling?
Yes, you can enhance the flavor by adding ingredients like lemon zest or almond extract for a unique twist. Just keep the proportions balanced.
Conclusion
Bringing the tastes of the tropics into your kitchen is made easy with this King Hawaiian Cheesecake Danish. It’s a delightful way to elevate a basic breakfast or dessert, perfect for gatherings or a rich personal treat.
With its fluffy layers and smooth, creamy filling, this Danish promises to impress anyone who takes a bite. Take a moment to savor the process as you create this masterpiece, and enjoy the delicious results!
Recipe Card

Delightful King Hawaiian Cheesecake Danish Recipe
Ingredients
- 1 loaf King Hawaiian bread
- 8 oz cream cheese softened
- 1/2 cup granulated sugar
- 1 large egg
- 1 teaspoon vanilla extract
- 1/4 cup shredded coconut optional
- 1 egg wash 1 egg beaten with 1 tbsp water
- Powdered sugar for dusting optional
Instructions
- Preheat your oven to 375°F (190°C).
- Prepare the cream cheese filling by beating together the cream cheese, sugar, egg, vanilla extract, and shredded coconut until smooth.
- On a clean surface, slice the King Hawaiian bread horizontally into three even layers.
- Spread an even layer of the cream cheese filling on the bottom layer of the bread, then place the second layer on top and repeat the process until all layers are filled.
- Place the final layer of bread on top and brush the entire surface with the egg wash.
- Transfer the layered Danish to a baking sheet lined with parchment paper.
- Bake in the preheated oven for 25-30 minutes, or until golden brown.
- Let the Danish cool for a few minutes before dusting with powdered sugar and serving.
Notes
Additional serving suggestions: pair with a crisp salad, garlic bread, or roasted seasonal vegetables for balance.
For make-ahead, prep components separately and assemble just before heating to preserve texture.
Taste and adjust with acid (lemon/vinegar) and salt right at the end to wake up flavors.