Introduction
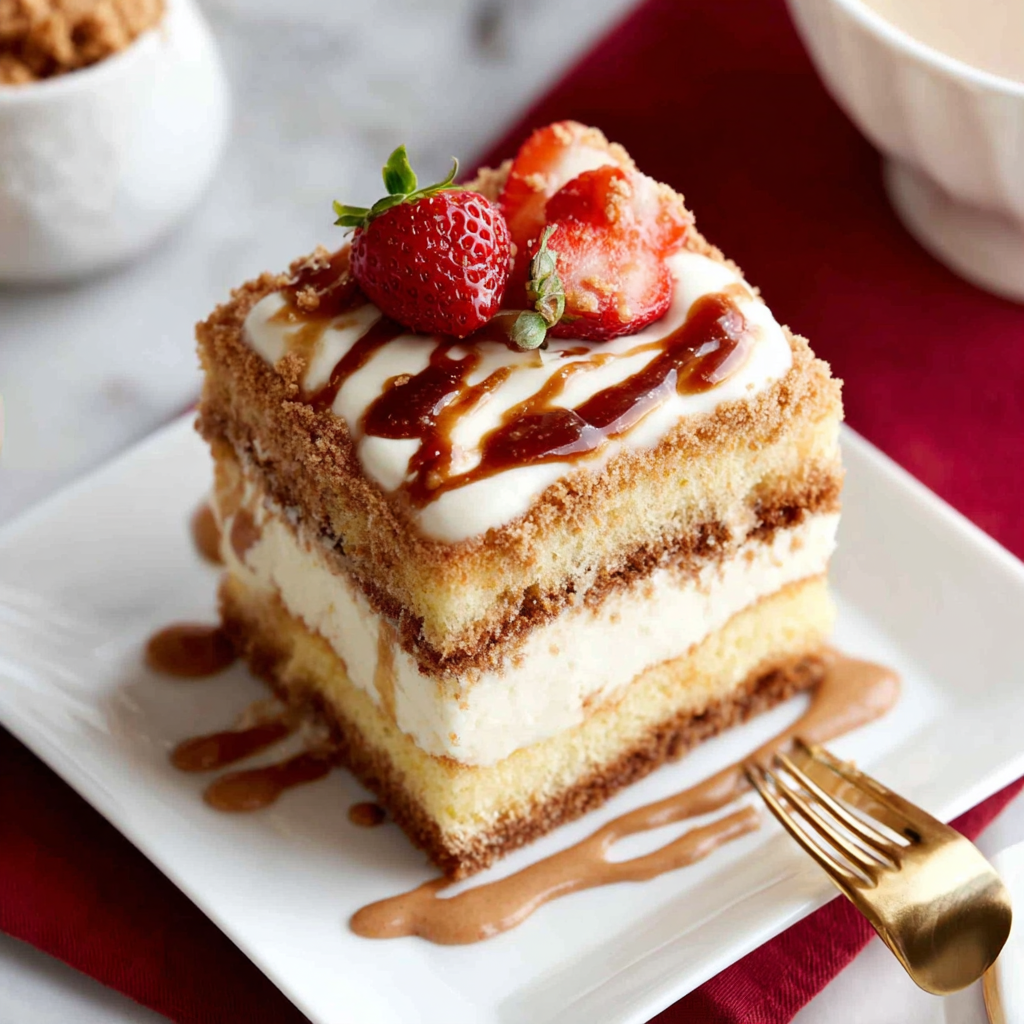
Sponge cake is a beloved classic known for its light and airy texture. The introduction of Biscoff spread elevates this simple dessert to a new level, infusing it with a rich, caramelized flavor that is simply irresistible. This cake is perfect for special occasions or a casual afternoon tea.
By incorporating Biscoff into both the cake and the cream filling, you create a delightful harmony of textures and tastes. The cream adds a luscious contrast to the sponge, making every bite a memorable experience. Get ready to impress your family and friends with this unique and delectable creation!
Ingredients
- 200g all-purpose flour
The foundation of the sponge cake, all-purpose flour provides the necessary structure and stability. It allows the cake to rise properly, creating that perfect airy texture. - 6 large eggs
Eggs are crucial in sponge cake recipes as they act as a binding agent. They also contribute to the cake's moisture and richness, helping it to rise beautifully in the oven. - 200g granulated sugar
Sugar not only sweetens the cake but also aids in the aeration process when beaten with eggs. This contributes to a light texture, making the sponge fluffy and tender. - 100g unsalted butter, melted
Melted butter adds richness and flavor to the cake while ensuring moisture. It helps to create a tender crumb, which is essential for a successful sponge. - 1 tsp baking powder
Baking powder acts as a leavening agent, helping the sponge to rise and achieve a light texture. This is important to ensure that the cake does not turn out dense. - 1 tsp vanilla extract
Vanilla enhances the overall flavor profile, complementing the caramel notes of the Biscoff. A good quality extract will elevate your cake's taste. - 250g Biscoff spread
This iconic spread brings a distinct caramel flavor and smooth texture to the cake, creating a delightful balance with the cream. It can also be used for drizzling and decorating. - 300ml heavy cream
Heavy cream is essential for making a rich, velvety whipped cream that adds lusciousness to the cake. It can also be flavored to enhance the overall dessert experience. - 30g powdered sugar
Powdered sugar sweetens the whipped cream without adding grittiness. It's blended easily and helps maintain a smooth texture when whipped.
Directions & Preparation
Step 1: Preheat your oven to 180°C (350°F).
Preheating the oven is a crucial step for baking, as it ensures that the cake begins to cook at the right temperature as soon as it goes in. A properly preheated oven allows even rising, leading to a fluffy texture.
Step 2: In a large mixing bowl, beat the eggs and sugar until pale and fluffy.
Beating eggs with sugar incorporates air into the mixture, which is key for creating the desired light and airy sponge. The volume should nearly triple in size and the mixture should fall in ribbons when lifted with a whisk.
Step 3: Gradually fold in the flour and baking powder until just combined.
Folding is a gentle technique that preserves the air you've incorporated into the eggs. It’s important not to overmix at this stage to maintain the lightness of the batter, so stop as soon as there are no dry patches.
Step 4: Stir in the melted butter and vanilla extract, being careful not to deflate the batter.
Incorporating melted butter adds richness to the batter without losing the airiness achieved with the egg mixture. The vanilla will enhance the flavor, blending seamlessly into the cake.
Step 5: Pour the batter into a lined 9-inch round cake tin and smooth the top.
Ensuring the batter is evenly spread in the tin allows for uniform baking. This helps prevent the cake from doming too much, leading to an even surface that is easier to frost.
Step 6: Bake for 25-30 minutes or until a toothpick inserted comes out clean.
Baking time is crucial; check the cake at the lower end of the timeframe. A toothpick should come out clean, and the cake should spring back lightly when pressed to indicate it is fully cooked.
Step 7: Allow the cake to cool in the tin for 10 minutes, then transfer to a wire rack.
Cooling in the tin helps the cake set before it's removed. Transferring to a rack allows air to circulate, preventing the bottom from becoming soggy.
Step 8: Once cooled, slice the cake in half horizontally.
Slicing the cake while it's cool ensures a cleaner cut and helps maintain its structure. This is also where you can add the Biscoff and cream filling effectively.
Step 9: Whip the heavy cream with powdered sugar until soft peaks form.
Whipping cream until soft peaks form creates a stable texture for your filling. Take care not to overwhip, or it might turn grainy, which will affect the smoothness of the final dessert.
Step 10: Spread a generous layer of Biscoff on one half of the cake, followed by whipped cream.
Layering Biscoff before the cream allows the distinct flavor to shine through. Spreading evenly helps create a balanced flavor in every slice, enhancing the overall dessert experience.
Step 11: Place the top half of the cake on, then spread more Biscoff and cream on top.
Finish the cake with a beautiful layer of Biscoff and whipped cream on top, making it visually appealing. It provides a consistent flavor throughout and adds an extra creamy indulgence.
Step 12: Chill the assembled cake for 30 minutes to set before serving.
Chilling allows the layers to meld together and makes slicing easier. It helps the whipped cream firm slightly, creating a perfect texture when served.

Embracing the Biscoff Flavor in Your Baking
Biscoff spread, made from speculoos cookies, not only lends its unique flavor to this sponge cake but also provides a context for creativity in baking. Trying different applications like incorporating it into frostings or cream adds depth to your desserts. Understanding its versatility opens doors to endless flavor combinations that keep your baking exciting.
Tips for Achieving the Perfect Sponge Texture
Achieving the perfect sponge texture involves attention to detail in aeration and mixing techniques. Starting with room temperature eggs allows for greater volume when whisked. Additionally, using the right flour ensures that the cake rises properly while maintaining its delicate crumb. Following these tips will elevate your sponge cake game significantly.
Serving Suggestions for Your Biscoff Creation
When it comes to serving this Biscoff and cream sponge cake, consider pairing it with a cup of coffee or tea to complement the flavors. You can also add a drizzle of chocolate sauce or caramel for added decadence. Presenting it with a garnish of crushed Biscoff cookies on top not only enhances the visual appeal but also provides a delightful crunch.
FAQs
What if my sponge cake turns out too dry?
If your sponge comes out dry, it may have baked too long or at too high a temperature. Ensure you check for doneness early and keep your oven calibrated.
Can I use a different spread instead of Biscoff?
Yes, you can substitute Biscoff with other spreads like Nutella or almond butter, but keep in mind the flavor profile will change.
What should I do if my batter feels too thick?
If the batter seems too thick, you can add a tablespoon of milk or water to loosen it. Be cautious not to overdo it, as you want to maintain the lightness.
Why did my cake not rise as expected?
If your cake didn’t rise, check whether your baking powder is fresh. Also, ensure you properly aerate the egg-sugar mixture and fold in the flour gently.
Is there a way to enhance the cream’s flavor?
Absolutely, you can add a touch of vanilla extract, a hint of almond extract, or even a splash of coffee to complement the Biscoff flavor.
What other toppings would go well with the cake?
Aside from Biscoff spread, toppings like sliced bananas, berries, or a dusting of cocoa powder can add contrasting flavors and textures.
Conclusion
Creating a sponge cake with Biscoff and cream is not just about baking; it’s about crafting a delightful experience. The combination of airy sponge, creamy filling, and unique flavor makes it an impressive dessert for any occasion.
With the right techniques and a little creativity, you can make this cake a signature sweet treat that will leave a lasting impression. Happy baking and enjoy every slice of your creation!
Recipe Card
Flavorful Sponge Cake with Biscoff and Cream Delight
Ingredients
- 200 g all-purpose flour
- 6 large eggs
- 200 g granulated sugar
- 100 g unsalted butter melted
- 1 tsp baking powder
- 1 tsp vanilla extract
- 250 g Biscoff spread
- 300 ml heavy cream
- 30 g powdered sugar
Instructions
- Preheat your oven to 180°C (350°F).
- In a large mixing bowl, beat the eggs and sugar until pale and fluffy.
- Gradually fold in the flour and baking powder until just combined.
- Stir in the melted butter and vanilla extract, being careful not to deflate the batter.
- Pour the batter into a lined 9-inch round cake tin and smooth the top.
- Bake for 25-30 minutes or until a toothpick inserted comes out clean.
- Allow the cake to cool in the tin for 10 minutes, then transfer to a wire rack.
- Once cooled, slice the cake in half horizontally.
- Whip the heavy cream with powdered sugar until soft peaks form.
- Spread a generous layer of Biscoff on one half of the cake, followed by whipped cream.
- Place the top half of the cake on, then spread more Biscoff and cream on top.
- Chill the assembled cake for 30 minutes to set before serving.
Notes
Additional serving suggestions: pair with a crisp salad, garlic bread, or roasted seasonal vegetables for balance.
For make-ahead, prep components separately and assemble just before heating to preserve texture.
Taste and adjust with acid (lemon/vinegar) and salt right at the end to wake up flavors.