Introduction
There’s something magical about the combination of chocolate and peanut butter that evokes blissful nostalgia. This no-bake chocolate peanut butter pie is a testament to this delicious duo, bringing together creamy and decadent flavors in a dessert that’s effortlessly simple yet indulgent.
Perfect for gatherings or a midweek treat, this pie doesn’t require any baking, making it an ideal choice for cooks of all skill levels. Each slice delivers a satisfying richness and a delightful mix of textures—from the smooth filling to the crumbly crust.
Ingredients
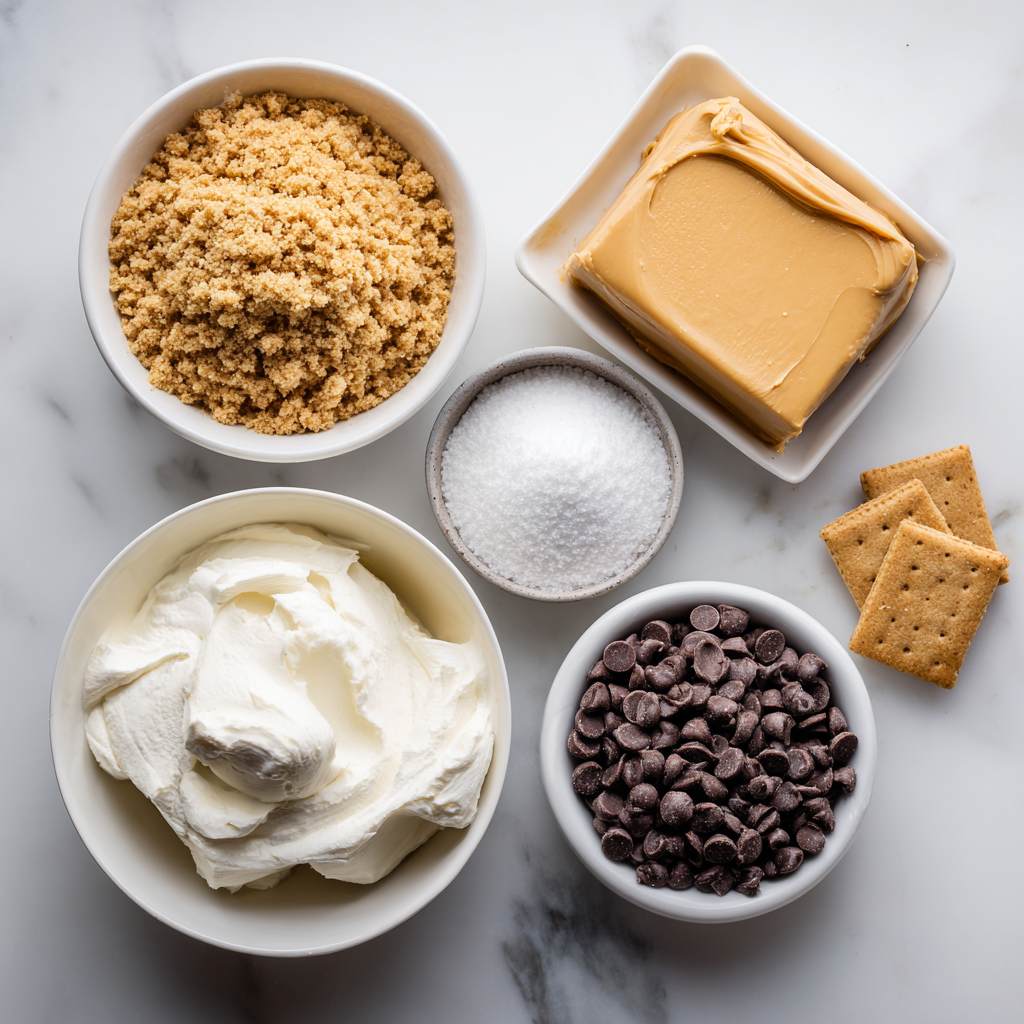
- 1 ½ cups graham cracker crumbs
Graham cracker crumbs form the base of the pie crust, providing a sweet, slightly nutty flavor and a firm texture. This no-bake crust gives the pie its foundational structure while adding a nice crunch that complements the creamy filling. - ½ cup unsalted butter, melted
Melted butter binds the graham cracker crumbs together, ensuring that they hold their shape once settled in the pie dish. It adds richness and moisture, enhancing the overall flavor of the crust and ensuring it’s not too dry. - 1 cup creamy peanut butter
Creamy peanut butter is the star of the filling, providing a smooth texture and a rich, nutty taste. It lends the pie its indulgent profile and balances well with the sweetness of the other ingredients. - 1 cup powdered sugar
Powdered sugar is used to sweeten the peanut butter filling, ensuring a smooth consistency without the gritty texture that granulated sugar could create. It also thickens the mixture, contributing to the pie’s creamy integrity. - 8 ounces cream cheese, softened
Softened cream cheese adds a tangy flavor to the filling, enhancing its richness. It also brings a velvety texture, helping to balance the sweetness while providing a creamy foundation that holds everything together. - 1 cup heavy whipping cream
Heavy whipping cream is whisked to form soft peaks, adding lightness and volume to the filling. This ingredient creates a luscious texture and makes the pie airy and less dense while enhancing its overall creaminess. - ½ cup semi-sweet chocolate chips
Semi-sweet chocolate chips are melted and drizzled on top for a touch of decadence. They provide a beautiful contrast to the peanut butter filling and enhance the chocolate flavor profile of the pie.
Directions & Preparation
Step 1: Prepare the crust
In a mixing bowl, combine the graham cracker crumbs and melted butter until well blended. Press this mixture into the bottom and up the sides of a pie pan to form an even layer. The firmness of the crust is crucial as it serves as the foundation of the pie. Make sure to press firmly to avoid cracks, ensuring your pie holds its shape once cut.
Step 2: Make the filling
In a large mixing bowl, beat the softened cream cheese until smooth. Add the peanut butter and powdered sugar, mixing thoroughly until combined. This step is essential as a well-blended filling ensures a consistently creamy texture. Remember to scrape down the sides of the bowl to incorporate all ingredients, avoiding any lumps.
Step 3: Whip the cream
In a separate bowl, whisk the heavy cream until soft peaks form. Gently fold the whipped cream into the peanut butter mixture, taking care not to deflate the volume you’ve created. This is a key moment for the pie’s texture; the whipped cream adds airiness, turning a denser filling into a light and fluffy delight.
Step 4: Assemble the pie
Spread the peanut butter filling into the prepared crust, smoothing the top with a spatula. This is where the pie comes to life, and a clean, even surface adds visual appeal. Make sure to fill the crust all the way to the edges for an even distribution of flavors.
Step 5: Melt the chocolate
Melt the semi-sweet chocolate chips in a microwave or double boiler until smooth. Allow it to cool slightly before drizzling over the pie. This step adds not only a beautiful finish but also an additional layer of chocolatey goodness that enhances the pie’s overall richness.
Step 6: Chill the pie
Place the assembled pie in the refrigerator for at least 4 hours or overnight to set properly. Chilling allows the flavors to meld beautifully and ensures a firm slice when you cut into it. The waiting game may be tough, but patience ensures a perfect pie.
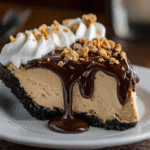
Step 7: Serve and enjoy
Once set, slice and serve the pie, optionally garnishing with additional whipped cream or chocolate shavings if desired. Presentation elevates the dessert and adds a touch of elegance. Sharing this delightful treat is sure to bring smiles, making it a perfect end to any meal.
Elevating Your Pie Crust Game
The graham cracker base is classic, but consider experimenting with different kinds of cookies for a unique flavor twist. Oreo crumbs will infuse your crust with a chocolatey richness, while vanilla wafers can provide a different sweetness that pairs beautifully with the peanut butter filling.
Adding a Flavor Kick
To give your pie an extra layer of flavor, consider mixing in a teaspoon of vanilla extract into the filling or even a pinch of sea salt. The salt can help balance the sweetness, while vanilla enhances the overall aroma and flavor profile, transforming a delicious dessert into an unforgettable experience.
Presentation Matters
When serving your pie, think beyond the plate—garnish with shaved chocolate or a sprinkle of crushed peanuts to add texture and visual flair. Consider serving it alongside fresh berries for a burst of color and a refreshing contrast to the richness of the pie, elevating the experience for your guests.
FAQs
What can I use instead of powdered sugar?
You can substitute powdered sugar with granulated sugar or a sugar alternative, but the texture may change. Ensure to blend well to avoid a gritty filling, and consider adjusting the amount to taste.
What if my filling is too thick?
If the filling turns out too thick, you can gently fold in a small amount of whipped cream or milk until the desired consistency is reached. This will help loosen it without compromising the flavor.
Can I incorporate other flavors into the filling?
Absolutely! You can add a splash of maple syrup or a bit of cinnamon for a delightful twist. Just ensure the additions complement the existing flavors rather than overpower them.
How can I make the pie more chocolatey?
To enhance the chocolate flavor, consider adding cocoa powder to the filling or incorporating chocolate pudding mix into the mixture. This increases the chocolate presence without altering the texture too much.
What if my pie doesn’t set properly?
If the pie doesn’t set, it may need more chilling time in the fridge. Ensure it is well covered so it doesn’t absorb odors and check periodically until it reaches the desired firmness.
Is there a way to make it less sweet?
You can reduce the amount of powdered sugar to taste or incorporate a bit of unsweetened cocoa powder for balance. Starting with less and adjusting as needed helps you maintain the right flavor profile.
Conclusion
This no-bake chocolate peanut butter pie truly delivers on the promise of indulgence without the fuss of an oven. Its luscious textures and rich flavors make it a crowd-pleaser that will leave your guests asking for seconds.
Whether it’s for a special occasion or simply to satisfy a sweet craving, this pie is easy to prepare and guaranteed to impress. So gather your ingredients, embrace the joy of creating, and enjoy every blissful bite.
Recipe Card
Indulgent No-Bake Chocolate Peanut Butter Pie Bliss
Ingredients
- 1 ½ cups graham cracker crumbs
- ½ cup unsalted butter melted
- 1 cup creamy peanut butter
- 1 cup powdered sugar
- 8 ounces cream cheese softened
- 1 cup heavy whipping cream
- ½ cup semi-sweet chocolate chips
Instructions
- Prepare the crust
- Make the filling
- Whip the cream
- Assemble the pie
- Melt the chocolate
- Chill the pie
- Serve and enjoy
Notes
Additional serving suggestions: pair with a crisp salad, garlic bread, or roasted seasonal vegetables for balance.
For make-ahead, prep components separately and assemble just before heating to preserve texture.
Taste and adjust with acid (lemon/vinegar) and salt right at the end to wake up flavors.