Introduction
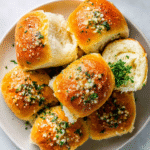
Garlic bread rolls can transform an ordinary meal into something spectacular. Whether you’re serving them alongside pasta, soup, or a hearty salad, these rolls are a delightful addition that will tantalize your taste buds.
The combination of warm, fresh bread and aromatic garlic provides a comforting, satisfying experience. These rolls are fluffy, easy to pull apart, and packed with garlic flavor that complements any dish beautifully.
Ingredients

- 4 cups all-purpose flour
All-purpose flour is the foundation for these rolls, providing structure and stability. It has sufficient protein content to form gluten when mixed, resulting in a chewy yet soft texture. - 1 packet (2 1/4 teaspoons) active dry yeast
Yeast is crucial for the leavening process. It ferments sugars, producing carbon dioxide that causes the dough to rise and gives the rolls their lightness. - 1 teaspoon sugar
Sugar acts as food for the yeast, helping it to activate and grow. It also adds a hint of sweetness to balance the savory garlic flavor. - 1 1/2 teaspoons salt
Salt enhances the overall flavor of the rolls and controls yeast activity, preventing them from rising too quickly and resulting in a better texture. - 1 cup warm water (110°F)
Warm water is essential to awaken the yeast. The ideal temperature ensures that it activates efficiently without killing the yeast. - 1/4 cup unsalted butter, melted
Melted butter enriches the dough, giving the rolls a tender crumb and a rich flavor. Additionally, it adds moisture, preventing the rolls from becoming dry. - 4-6 cloves garlic, minced
Garlic is the star of this recipe, providing a bold flavor. Freshly minced garlic infuses the rolls with a delightful aroma and punch of taste. - 1/4 cup chopped fresh parsley (optional)
Fresh parsley enhances the visual appeal and adds a subtle freshness to the rolls, balancing the richness of the garlic and butter.
Directions & Preparation
Step 1: Activate the yeast.
In a small bowl, mix the warm water with sugar and yeast. Let it sit for about 5-10 minutes until it becomes foamy. This bubbling foam indicates that the yeast is active and ready to leaven your dough. If it doesn’t foam, your yeast may be inactive, and you should start over with fresh yeast.
Step 2: Prepare the dough.
In a large bowl, combine flour and salt. Create a well in the center, then add the yeast mixture and melted butter. Mix until a shaggy dough forms. This step is vital for ensuring that all ingredients are well-distributed, which affects the dough’s consistency as it develops.
Step 3: Knead the dough.
Transfer the dough onto a lightly floured surface and knead for about 8-10 minutes until it’s smooth and elastic. Kneading strengthens the gluten network, crucial for creating fluffy rolls. It’s during this stage that the dough will become more cohesive and less sticky.
Step 4: First rise.
Place the kneaded dough in a greased bowl, cover it with a damp cloth, and let it rise in a warm spot for about 1 hour or until doubled in size. This resting period is essential for developing the rolls’ airy texture through fermentation.
Step 5: Prepare the garlic mixture.
While the dough rises, mix the minced garlic, melted butter, and parsley in a small bowl. This mixture will be brushed onto the rolls for maximum flavor, ensuring that every bite is aromatic and delicious.
Step 6: Shape the rolls.
Once the dough has risen, punch it down to release excess gas. Divide it into equal pieces (about 12), shape each into a ball, and place them in a greased baking dish. Shaping ensures uniform cooking and a pleasing appearance.
Step 7: Second rise.
Cover the shaped rolls and let them rise for another 30 minutes. This second rise is important for achieving that light, airy texture. Be patient and allow them to puff up to about one-and-a-half times their size.
Step 8: Preheat the oven.
Preheat your oven to 375°F (190°C) while the rolls are rising. A properly heated oven ensures that the rolls bake evenly and develop a beautifully golden crust.
Step 9: Bake the rolls.
Bake the rolls for about 15-20 minutes until golden brown. This step allows the rolls to fully cook through while developing a crispy exterior that contrasts beautifully with the soft interior.
Step 10: Brush with garlic mixture.
Remove the rolls from the oven and immediately brush them with the garlic mixture. This not only adds a luscious shine but intensifies the garlic flavor right out of the oven, making the rolls irresistible.
Step 11: Cool and serve.
Allow the rolls to cool for a few minutes before serving. This resting period finishes the cooking inside, making them easier to tear apart and ready to enjoy at their best.
Enhancing Flavor with Fresh Herbs
Incorporating fresh herbs like parsley or basil can elevate your garlic bread rolls to a new level. Not only do they add a pop of color, but they also contribute a fresher taste, complementing the rich garlic and buttery flavors. Experimenting with different herbs allows for personalization to suit your palate.
The Science of Dough Kneading
Kneading dough is not merely a physical task; it’s a science that develops gluten within the flour. Gluten is the network responsible for trapping air and moisture, which gives bread its characteristic rise and chewy texture. Proper kneading enhances the structure of your rolls, making them fluffy and light.
Storing and Reheating Rolls
To keep your garlic bread rolls fresh for longer, store them in an airtight container at room temperature. For reheating, a quick pop in the oven or microwave wrapped in a damp paper towel can revitalize their softness. This practice helps maintain the delightful garlic aroma and texture.
FAQs
What should I do if my rolls don’t rise?
If your rolls don’t rise, ensure that your yeast was fresh and activated properly with warm water. Inadequate kneading can also prevent proper gluten development.
Can I use garlic powder instead of fresh garlic?
Yes, you can use garlic powder, but use it sparingly, as it is more concentrated. About 1 teaspoon should suffice, mixed with the butter.
What if my rolls are too dense?
If the rolls are too dense, they may not have risen enough during the proving stages. Ensure your environment is warm for optimal yeast activity.
How can I make these rolls more cheesy?
For cheesy garlic bread rolls, add shredded cheese such as mozzarella or parmesan to the dough or sprinkle it on top before baking.
Can I replace all-purpose flour with whole wheat flour?
You can substitute whole wheat flour, but you may need to adjust the water. Whole wheat absorbs more moisture, so add a little extra to achieve the right consistency.
What if I want a crustier exterior?
For a crusty exterior, bake the rolls in a steam-filled oven by placing a small pan of water on the bottom rack. This adds humidity, helping the crust develop.
Conclusion
Garlic bread rolls are not just a side dish; they are a delightful experience that complements any meal. With the right ingredients and techniques, anyone can create these irresistible rolls at home.
Next time you’re looking to impress at dinner, consider making these rolls. They are sure to evoke smiles and satisfaction at your table, proving that homemade bread can be both simple and spectacular.
Recipe Card
Baking Fluffy Garlic Bread Rolls at Home
Ingredients
- 4 cups all-purpose flour
- 1 packet 2 1/4 teaspoons active dry yeast
- 1 teaspoon sugar
- 1 1/2 teaspoons salt
- 1 cup warm water 110°F
- 1/4 cup unsalted butter melted
- 4-6 cloves garlic minced
- 1/4 cup chopped fresh parsley optional
Instructions
- Activate the yeast.
- Prepare the dough.
- Knead the dough.
- First rise.
- Prepare the garlic mixture.
- Shape the rolls.
- Second rise.
- Preheat the oven.
- Bake the rolls.
- Brush with garlic mixture.
- Cool and serve.
Notes
Additional serving suggestions: pair with a crisp salad, garlic bread, or roasted seasonal vegetables for balance.
For make-ahead, prep components separately and assemble just before heating to preserve texture.
Taste and adjust with acid (lemon/vinegar) and salt right at the end to wake up flavors.