Introduction
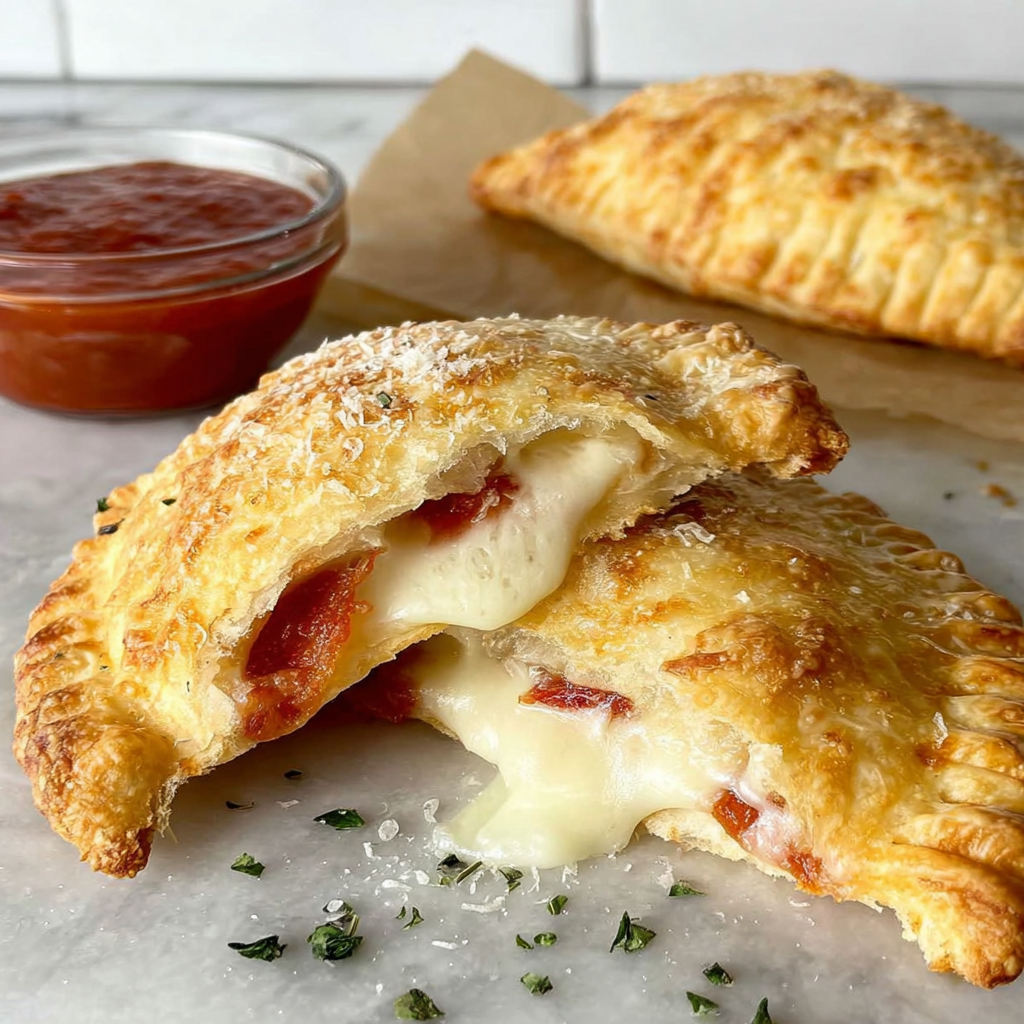
Few things embody comfort food quite like cheesy pizza pockets. These delightful bundles of dough filled with savory cheese and toppings provide an easy solution for hunger pangs. Whether it’s a snack, appetizer, or main dish, they cater to both kids and adults alike.
Making your own pizza pockets at home allows you to customize the fillings and use fresh ingredients, elevating them beyond frozen versions. Serve them with marinara or your favorite dipping sauce for an added burst of flavor.
The versatility of these pockets means they can fit into any meal plan. From dinner parties to casual family dinners, they’re a hit that can be made quickly and enjoyed by all.
Ingredients

- 2 cups all-purpose flour
The base of our pizza dough, all-purpose flour provides structure and elasticity. It helps create a chewy texture, ensuring that the pizza pockets hold their shape while baking. - 1 teaspoon salt
Salt is vital for enhancing the overall flavor of the dough. It also helps strengthen the gluten structure, aiding in the proper rise and texture of the pizza pocket. - 1 tablespoon sugar
Sugar not only balances the savory flavors but also feeds the yeast, encouraging proper fermentation. This results in a light and fluffy crust. - 1 tablespoon instant yeast
Instant yeast allows for quicker rising without needing proofing. It makes the dough easier to handle and reduces preparation time. - 1 tablespoon olive oil
Olive oil adds richness and moisture to the dough, resulting in a tender texture. It also helps prevent the dough from sticking during preparation. - 3/4 cup warm water
Warm water activates the yeast and helps dissolve the sugar and salt. The right temperature is essential for yeast fermentation, making the dough rise effectively. - 1 cup shredded mozzarella cheese
Mozzarella is the classic cheese for pizza due to its excellent melting properties and creamy texture. It brings that signature cheesy goodness to each pocket. - 1/2 cup diced pepperoni
Pepperoni adds a bold, savory flavor that perfectly complements the cheese. It is a popular pizza topping that enhances the overall taste profile of the pockets. - 1/4 cup pizza sauce
Pizza sauce is ideal for adding moisture and flavor inside the pockets. It ensures that the filling remains flavorful and doesn’t dry out during cooking. - 1 teaspoon Italian seasoning
Italian seasoning, a blend of herbs, enhances the flavor of the pizza pockets, bringing a burst of aromatic tastes that remind you of classic pizza.
Directions & Preparation
Step 1: In a large bowl, combine flour, salt, sugar, and yeast.
Combining these dry ingredients first is crucial for an even distribution of salt and sugar. Yeast needs both for optimal rising, and the flour provides structure for the dough. By mixing them well, you ensure that the yeast can perform effectively when added to the wet mixture.
Step 2: Add warm water and olive oil to the dry ingredients.
Adding warm water and olive oil creates a hydrating environment that activates the yeast. Mix until a shaggy dough forms, incorporating all dry ingredients. At this point, the dough will still be rough and not fully cohesive, which is normal.
Step 3: Knead the dough on a floured surface for about 5-7 minutes.
Kneading develops the gluten in the flour, resulting in a stretchy, elastic dough that can hold the fillings securely. You’ll know it’s ready when the dough becomes smooth and elastic to the touch, indicating that the gluten has formed properly.
Step 4: Place the dough in a greased bowl, cover it, and let it rise for 1 hour or until doubled in size.
Allowing the dough to rise is critical for achieving airy pockets. The yeast ferments, producing gas that expands the dough. Covering it helps retain warmth, creating an ideal environment for rising. They should become noticeably larger during this period.
Step 5: Preheat the oven to 400°F (200°C).
Preheating the oven ensures that the pizza pockets bake evenly and develop a golden-brown crust. An adequately heated oven promotes the rapid rise of the dough, allowing it to puff up nicely during baking.
Step 6: On a floured surface, roll out the dough into a large rectangle.
Rolling out the dough creates even thickness, ensuring uniform cooking. A rectangular shape makes it easier to cut out equal squares for the filling. The dough should be about 1/4 inch thick.
Step 7: Cut the dough into squares, approximately 4×4 inches.
Size matters for these pockets; they need to be large enough to hold the filling without bursting. Use a sharp cutter or pizza wheel for clean edges. A well-defined square also ensures even baking and easy handling.
Step 8: Place cheese, pepperoni, and a teaspoon of pizza sauce onto the center of each square.
This is where you can customize your pockets. Be sure not to overfill; leaving some space around the edges allows for proper sealing. Each component should balance in flavor and moisture, so they meld perfectly during baking.
Step 9: Fold the squares over to create triangles and press to seal.
Sealing the edges properly prevents the filling from leaking out during baking. You can also use a fork to crimp the edges for added security and decorative flair. Ensure that the creases are tight to lock in all flavors.
Step 10: Place the pockets on a greased baking sheet and brush with olive oil.
Brushing the tops with olive oil gives the pockets a beautiful golden color and enhances their flavor. It also helps them crisp up nicely in the oven, making them appealing and enhancing the eating experience.
Step 11: Bake for 15-20 minutes or until golden brown.
Baking them until golden brown is key to achieving that crunchy exterior while keeping the interior gooey and melty. Keep an eye on them; overbaking can lead to tough pockets. A perfect bake results in a lovely contrast of textures.
Customizing Your Pizza Pocket Fillings
One of the joys of making pizza pockets is that the filling can be tailored to your tastes. Feel free to experiment with various cheeses like provolone or gouda, or add vegetables such as bell peppers or mushrooms. Leftover meats from previous meals can also make delightful additions. The possibilities are endless, so having fun with the fillings can lead to exciting new flavors.
Serving Suggestions for Perfect Pairings
To enhance your pizza pockets experience, consider serving them with a side of marinara or ranch dressing for dipping. A fresh garden salad can complement the richness of the pockets nicely. If you’re feeling adventurous, try drizzling them with balsamic glaze or a sprinkle of parmesan for gourmet flair.
Storage and Reheating Tips
If you find yourself with leftovers, store cooled pizza pockets in an airtight container in the refrigerator. They can be reheated in the oven to restore their crispy texture, or simply microwave them for a quicker option. Enjoying these again on a busy day makes them not just a great snack but also a convenient meal solution.
FAQs
Why did my pizza pockets spill their filling during baking?
If your pizza pockets spill their filling, it could be due to overfilling. Ensure you leave space at the edges to allow for sealing. If the dough isn’t sealed well enough, the filling might leak out.
What if my dough didn’t rise properly?
If your dough doesn’t rise, your yeast might be old or the water temperature could have been too hot or too cold. Always check the yeast’s expiration date and use warm water (not hot) to activate it.
Can I use pre-made dough instead of making my own?
Absolutely! Pre-made dough can save time and still yield excellent pizza pockets. Just roll it out and follow the filling and baking instructions as normal.
What if the dough feels too sticky when rolling it out?
If the dough is sticky, it may need more flour. Sprinkle additional flour on your work surface and on the rolling pin to manage the stickiness, preventing tearing.
Can I add more cheese or use a different type?
Definitely! You can add more cheese to your pockets for extra cheesiness or substitute with a cheese of your choice, keeping in mind how it melts and tastes.
How do I create a vegan version of these pizza pockets?
For a vegan version, use plant-based cheese substitutes and skip the pepperoni. You could include sautéed vegetables or vegan sausage as filling options.
Conclusion
Cheesy pizza pockets are a delightful and easy way to bring the flavors of pizza into a portable form. Their customizable nature allows you to experiment and cater to various preferences, making them suitable for any occasion.
Once you’ve mastered the basic recipe, the only limit is your imagination. Try different fillings and sauces to find your family’s favorites, ensuring that these pockets will remain a staple in your kitchen.
Recipe Card
Cheesy Pizza Pockets for Simple Snacks
Ingredients
- 2 cups all-purpose flour
- 1 teaspoon salt
- 1 tablespoon sugar
- 1 tablespoon instant yeast
- 1 tablespoon olive oil
- 3/4 cup warm water
- 1 cup shredded mozzarella cheese
- 1/2 cup diced pepperoni
- 1/4 cup pizza sauce
- 1 teaspoon Italian seasoning
Instructions
- In a large bowl, combine flour, salt, sugar, and yeast.
- Add warm water and olive oil to the dry ingredients.
- Knead the dough on a floured surface for about 5-7 minutes.
- Place the dough in a greased bowl, cover it, and let it rise for 1 hour or until doubled in size.
- Preheat the oven to 400°F (200°C).
- On a floured surface, roll out the dough into a large rectangle.
- Cut the dough into squares, approximately 4×4 inches.
- Place cheese, pepperoni, and a teaspoon of pizza sauce onto the center of each square.
- Fold the squares over to create triangles and press to seal.
- Place the pockets on a greased baking sheet and brush with olive oil.
- Bake for 15-20 minutes or until golden brown.
Notes
Additional serving suggestions: pair with a crisp salad, garlic bread, or roasted seasonal vegetables for balance.
For make-ahead, prep components separately and assemble just before heating to preserve texture.
Taste and adjust with acid (lemon/vinegar) and salt right at the end to wake up flavors.