Introduction
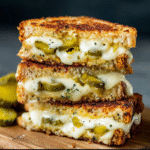
If you're seeking a unique twist on a classic favorite, the crispy dill pickle grilled cheese sandwich is your answer. This delicious combination marries the gooey, comforting texture of melted cheese with the zesty crunch of pickles, creating a sensational contrast that’s hard to resist.
This sandwich is not just a meal; it's an experience. The sharpness of cheese and the tanginess of pickles interact beautifully, making each bite a delightful surprise. Whether you're enjoying a cozy lunch at home or serving it at a casual gathering, this dish is sure to become a staple in your culinary repertoire.
Ingredients
- 2 slices of bread
Choose your favorite type of bread, such as sourdough or whole grain. The bread acts as a vessel, providing structure and flavor while absorbing some of the melted cheese's richness. - 2 ounces of sharp cheddar cheese
Sharp cheddar cheese is ideal for this sandwich as it melts wonderfully and offers a robust flavor that complements the dill pickles. The sharpness cuts through the richness of the butter and enhances each bite. - 2 ounces of dill pickles, sliced
Dill pickles add a tangy crunch that's crucial to this sandwich's character. Their acidity brightens the dish, balancing the cheese’s creaminess and adding a refreshing aspect to each mouthful. - 1 tablespoon of butter
Butter is essential for achieving a golden-brown crust on the bread. It also infuses the sandwich with rich flavor while helping the cheese melt into a gooey, satisfying texture. - 1 teaspoon of garlic powder
Garlic powder enhances the overall flavor profile of the sandwich without overwhelming it. This subtle addition complements both the cheese and pickles, creating a more rounded taste.
Directions & Preparation
Step 1: Preheat your skillet over medium heat.
Starting with a properly preheated skillet is key to achieving that perfect golden crust. A medium heat ensures the bread toasts evenly while allowing the cheese to melt thoroughly without burning.
Step 2: Spread butter on one side of each bread slice.
Butter not only helps with browning but also adds a luscious flavor to the sandwich. Make sure to cover each slice evenly; this ensures every bite is rich and enjoyable. Using softened butter makes this step much easier.
Step 3: Place one slice of bread, butter-side down, in the skillet.
Once the skillet is ready, lay down your first slice of bread. The immediate contact with the hot surface begins the toasting process, which is essential for building a superb crispy texture.
Step 4: Layer the cheese and pickles on the bread in the skillet.
Start with a generous layer of cheese, then add the dill pickle slices on top. The cheese acts as an adhesive, holding the pickles in place and ensuring that every bite delivers that signature flavor combination.
Step 5: Top with the second slice of bread, butter-side up.
Covering the filling with the second slice creates the classic sandwich shape. The butter ensures that the top layer will crisp up nicely, giving contrast to the gooey cheese and crunchy pickles inside.
Step 6: Cook for 3-4 minutes until golden brown.
Monitoring the cooking time is essential to prevent burning. This step helps the cheese begin to melt while achieving that desirable golden brown color on the exterior. Peeking under the sandwich will let you know when it's ready to flip.
Step 7: Carefully flip the sandwich and cook for another 3-4 minutes.
Flipping the sandwich maintains its structure while allowing the other side to brown and crisp. Using a spatula, press down gently to ensure even cooking and perfect melting of the cheese.
Step 8: Remove from skillet and let it rest for a minute.
Allowing the sandwich to rest lets the cheese set slightly, making it easier to slice. It also allows the flavors to meld, resulting in a more harmonious taste that’s well-balanced and enjoyable.
Step 9: Slice and serve hot.
Slicing the sandwich reveals the vibrant layers of cheese and pickles, making it visually appealing. Serving it hot maximizes the cheesy goodness and crunchy texture, ensuring each bite is satisfying and flavorful.

Perfecting the Crispy Crust
The secret to a truly crispy crust lies in the butter and the skillet's temperature. Using softened butter ensures an even spread, allowing for consistent browning. Additionally, maintaining a steady medium heat prevents scorching while ensuring the cheese melts to the right creamy consistency. The result is a sandwich that has crunch and richness without being greasy or overcooked.
Cheese Variations for Flavor Boosts
While sharp cheddar is a classic choice, experimenting with different cheeses can elevate the flavors of your crispy dill pickle grilled cheese. Consider trying pepper jack for a spicy kick, or a blend that includes mozzarella for extra meltiness. Each cheese brings its unique characteristics, transforming a simple sandwich into a gourmet experience tailored to your taste buds.
Pickle Styles to Enhance Your Sandwich
The choice of pickle can dramatically change the flavor profile of your sandwich. Bread-and-butter pickles offer a sweet contrast, while spicy dill pickles add a kick. For a gourmet twist, consider adding pickled jalapeños or tangy mustard pickles. Each variation introduces new layers of flavor, making the crispy dill pickle grilled cheese sandwich a versatile option for any meal.
FAQs
What if my cheese isn’t melting properly?
If your cheese isn't melting well, you might need to lower the heat and give it more time. Covering the skillet can also help trap heat, ensuring the cheese reaches the perfect gooey consistency.
How do I fix a sandwich that's too thick?
If your sandwich feels too thick, consider slicing the pickles and cheese thinner. Additionally, you can use less filling to allow for more even cooking, ensuring everything melts beautifully.
Can I use flavored cream cheese as a spread?
Absolutely! Using flavored cream cheese can add an interesting twist to your sandwich. Just be mindful of the additional flavors, as they may affect the overall balance of the dish.
What if I want to make a larger batch?
To make multiple sandwiches at once, you can use a griddle instead of a skillet. Just adjust the cook time slightly, checking each sandwich for that perfect golden crust.
Can I add more ingredients like bacon or avocado?
Certainly! Adding cooked bacon or avocado can make the sandwich even heartier. Just be careful not to overload it, as excessive filling can make it hard to cook evenly.
Why did my sandwich turn out bland?
If your sandwich lacks flavor, consider seasoning your pickles or adding more spices like garlic powder. Enhancing each layer with distinct flavors can make a significant difference in taste.
Conclusion
The crispy dill pickle grilled cheese sandwich is more than just a meal; it’s an adventure for the taste buds. Combining the comfort of melted cheese with the tangy crunch of pickles creates a delightful culinary experience that's both satisfying and unique.
Whether enjoyed on a lazy afternoon or as a fun addition to a gathering, this sandwich is sure to impress. With its straightforward preparation and ability to adapt to your taste, it's a dish that invites creativity and enjoyment in every bite.
Recipe Card
Crispy Dill Pickle Grilled Cheese Sandwich Delight
Ingredients
- 2 slices of bread
- 2 ounces of sharp cheddar cheese
- 2 ounces of dill pickles sliced
- 1 tablespoon of butter
- 1 teaspoon of garlic powder
Instructions
- Preheat your skillet over medium heat.
- Spread butter on one side of each bread slice.
- Place one slice of bread, butter-side down, in the skillet.
- Layer the cheese and pickles on the bread in the skillet.
- Top with the second slice of bread, butter-side up.
- Cook for 3-4 minutes until golden brown.
- Carefully flip the sandwich and cook for another 3-4 minutes.
- Remove from skillet and let it rest for a minute.
- Slice and serve hot.
Notes
Additional serving suggestions: pair with a crisp salad, garlic bread, or roasted seasonal vegetables for balance.
For make-ahead, prep components separately and assemble just before heating to preserve texture.
Taste and adjust with acid (lemon/vinegar) and salt right at the end to wake up flavors.