Introduction
Indulging in a sweet treat like peppermint Oreo truffles is an easy way to bring festive cheer to any gathering. These delightful confections combine the beloved crunch of Oreos with smooth cream cheese and a refreshing hint of peppermint, creating a blissful mouthful in each bite.
The beauty of these truffles lies not only in their taste but also in how simple they are to prepare. They make a perfect holiday gift, dessert for a party, or even a cozy snack for yourself while curling up with a favorite film.
Ingredients
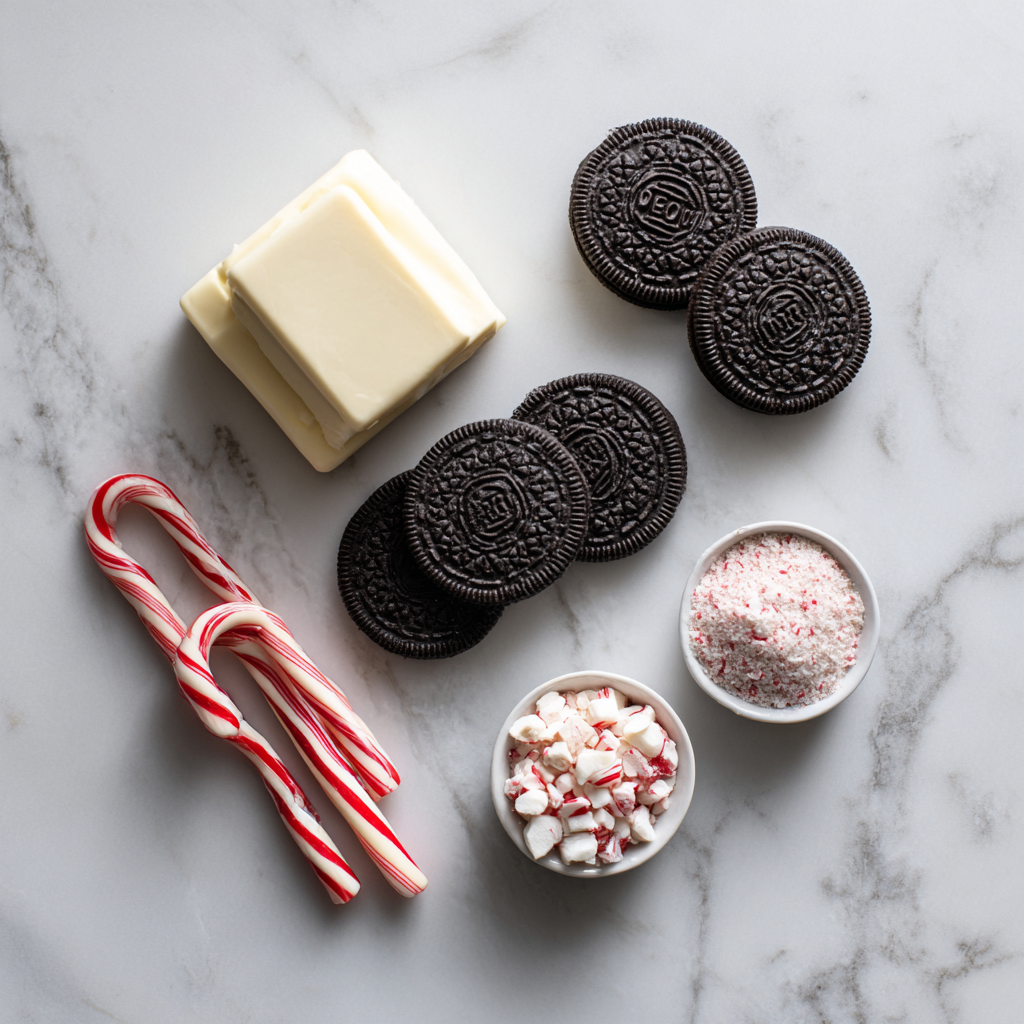
- 1 package Oreo cookies (about 14 ounces)
Oreo cookies provide the foundation for these truffles, delivering a rich chocolate flavor and a crunchy texture. The cream filling helps bind the mixture together, creating a cohesive base. - 1 package (8 ounces) cream cheese, softened
Cream cheese adds a luscious creaminess that balances the sweetness of the Oreos. Its smooth texture helps achieve a truffle consistency that can be rolled easily into balls. - 1 teaspoon peppermint extract
This extract infuses the truffles with a refreshing mint flavor, essential for giving them a festive touch. Be cautious with the amount, as peppermint can quickly overpower the other flavors. - 12 ounces white chocolate or candy melts
Melting chocolate coats the truffles, providing a sweet, smooth exterior that contrasts nicely with the crunchy interior. White chocolate is especially popular for its creamy flavor. - 2 tablespoons crushed peppermint candies or candy canes
These crushed pieces are used for garnish and not only add a pop of color but also an extra layer of minty freshness and delightful crunch on top of the coated truffles.
Directions & Preparation
Step 1: Crush the Oreo cookies into fine crumbs.
Start by placing the Oreo cookies in a food processor and pulse them until they turn into fine crumbs. This step is crucial, as it ensures that the truffles have a uniform texture. If you don’t have a food processor, you can also place the cookies in a zip-lock bag and crush them using a rolling pin.
Step 2: Mix the crushed Oreos with cream cheese and peppermint extract.
In a large bowl, combine the Oreo crumbs with softened cream cheese and peppermint extract. The cream cheese should be at room temperature for easy mixing. Use a spatula or your hands to blend everything until well combined; the mixture should be workable and sticky, ready to form into balls.
Step 3: Chill the mixture for about 30 minutes.
Chilling the mixture helps it firm up, making it easier to roll into truffle shapes. If the mixture is too soft, it may not hold together well during the coating process. Aim for a texture that you can cleanly scoop and roll without it sticking excessively to your hands.
Step 4: Scoop and roll the mixture into balls.
Using a small cookie scoop or your hands, take portions of the chilled mixture and roll them into 1-inch balls. This not only helps maintain uniform size but also ensures even coating later. Place the formed truffles on a parchment-lined baking sheet to avoid sticking.
Step 5: Melt the white chocolate or candy melts.
In a microwave or double boiler, melt the white chocolate slowly, stirring frequently until smooth. This ensures a silky texture perfect for coating. Be cautious not to overheat it, as chocolate can seize up if too much moisture or heat is applied.
Step 6: Dip each truffle in the melted chocolate and place on parchment paper.
Using a fork, dip each truffle into the melted white chocolate, coating it completely. Let excess chocolate drip off and then place the truffle back on the parchment paper. The coating should be even; this is key to achieving that delectable chocolate exterior.
Step 7: Sprinkle crushed peppermint on top immediately after coating.
While the chocolate coating is still wet, sprinkle crushed peppermint candies on top. This adds both a decorative element and an additional burst of flavor. Aim to do this quickly, as the chocolate will set fast.
Step 8: Let the truffles set at room temperature or in the fridge.
Allow the chocolate coating to harden completely, which can take anywhere from 20-30 minutes at room temperature or quicker in the fridge. Once set, your peppermint Oreo truffles are ready to be enjoyed or stored!
Why Choosing the Right Chocolate Matters
The type of chocolate you use for coating your peppermint Oreo truffles significantly influences their overall flavor and texture. While white chocolate is a popular choice, you could opt for dark or milk chocolate for a richer taste. Each type brings a different sweetness level and complements the peppermint in unique ways, so consider experimenting to find your favorite.
How to Customize Your Truffles
While the classic peppermint Oreo truffle is divine on its own, customization can elevate your creation further. Consider drizzling melted chocolate in contrasting colors over the hardened truffles or mixing in other flavor extracts, such as vanilla or almond, into the cream cheese mixture. Adding a splash of colorful sprinkles as a finishing touch can transform your truffles, making them eye-catching for any occasion.
Pairing Ideas for the Perfect Treat
These peppermint Oreo truffles make for an irresistible dessert, but they can also be paired beautifully with various beverages. Consider serving them alongside a cup of hot cocoa, a sweet peppermint mocha, or even a smooth glass of dessert wine. This pairing not only complements the minty flavor profile but also enhances the overall tasting experience, offering warmth and indulgence.
FAQs
What if my truffle mixture is too sticky to roll?
If your mixture is too sticky, try chilling it for a bit longer to firm up. Alternatively, you can dust your hands with powdered sugar to help roll them without sticking.
Can I use a different type of cookie instead of Oreos?
Yes, you can experiment with other cookies like chocolate wafers or even peanut butter cookies for a unique flavor, but be mindful of how the taste will blend with the cream cheese and peppermint.
How do I know when the chocolate is melted just right?
Melt until smooth and shiny, stopping before it becomes too thick or begins to bubble. It should have a consistent liquid texture that coats the back of a spoon.
What if my chocolate coating is too thick?
If your chocolate coating is too thick, try adding a small amount of shortening or coconut oil to thin it out. Melt together until you reach a smoother consistency.
Can I add more peppermint flavor without overwhelming the truffles?
To enhance the peppermint flavor, consider mixing a small amount of finely crushed peppermint candies into the chocolate coating rather than increasing the extract, which can be overpowering.
What if my chocolate coating is uneven or messy?
If your coating is uneven, you can always dip the truffles again for a neater finish or use a fork to drizzle additional chocolate over any spots that need touching up.
Conclusion
Peppermint Oreo truffles provide a wonderful balance of rich chocolatey sweetness and refreshing mint, making them a standout treat for any occasion. With their easy preparation and delightful results, they are bound to become a holiday favorite.
So gather your ingredients, invite some friends over, and enjoy creating these tasty delights that are sure to impress everyone who gets to taste them. Happy cooking!
Recipe Card

Decadent Peppermint Oreo Truffles for Every Occasion
Ingredients
- 1 package Oreo cookies about 14 ounces
- 1 package 8 ounces cream cheese, softened
- 1 teaspoon peppermint extract
- 12 ounces white chocolate or candy melts
- 2 tablespoons crushed peppermint candies or candy canes
Instructions
- Crush the Oreo cookies into fine crumbs.
- Mix the crushed Oreos with cream cheese and peppermint extract.
- Chill the mixture for about 30 minutes.
- Scoop and roll the mixture into balls.
- Melt the white chocolate or candy melts.
- Dip each truffle in the melted chocolate and place on parchment paper.
- Sprinkle crushed peppermint on top immediately after coating.
- Let the truffles set at room temperature or in the fridge.
Notes
Additional serving suggestions: pair with a crisp salad, garlic bread, or roasted seasonal vegetables for balance.
For make-ahead, prep components separately and assemble just before heating to preserve texture.
Taste and adjust with acid (lemon/vinegar) and salt right at the end to wake up flavors.