Introduction
The holidays are a time for indulgence, and what better way to celebrate than with Mint Chocolate Chip Snowball Cookies? These delightful confections marry the refreshing punch of mint with the comforting richness of chocolate, all while maintaining a light and airy texture. Perfect for holiday gatherings or simply as a sweet treat to brighten your day, these cookies are sure to impress your family and friends.
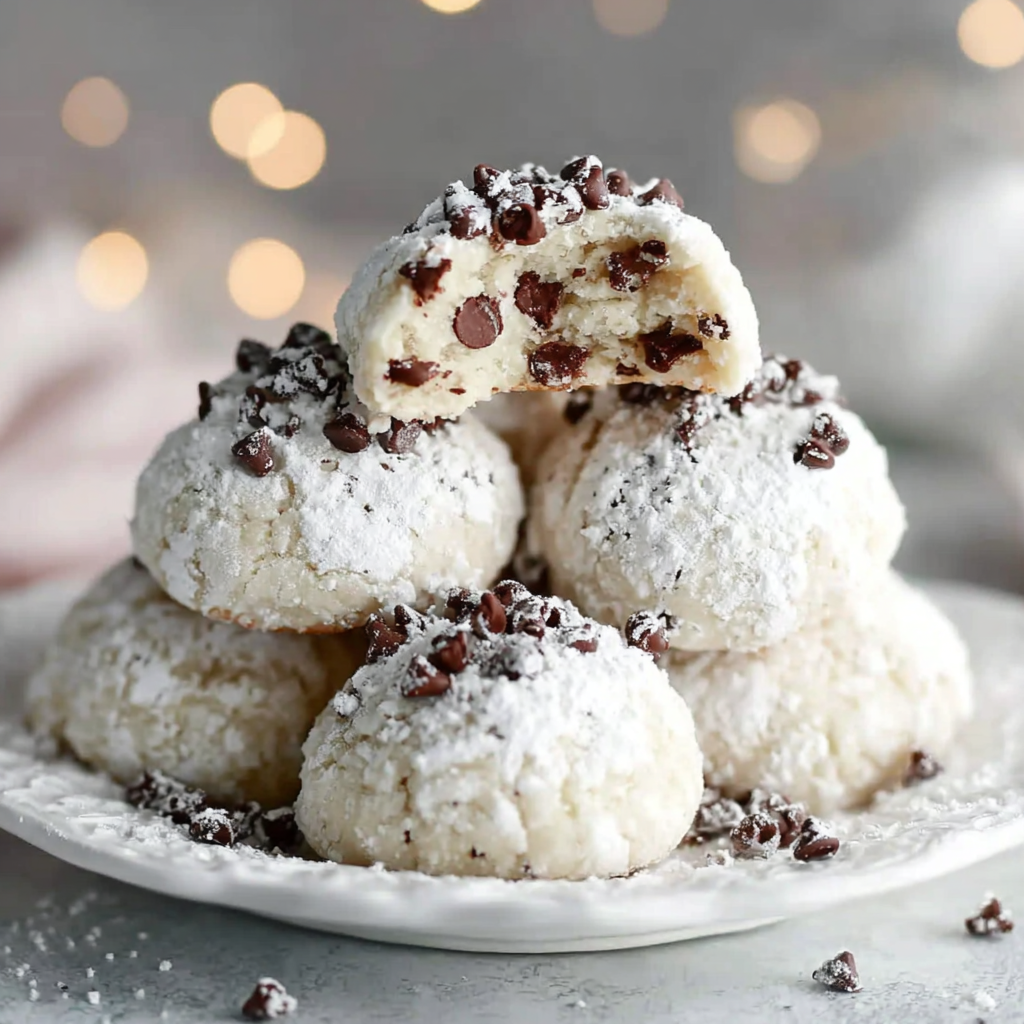
With their snowy appearance, these cookies not only look festive, but they also offer a unique flavor experience that combines the best of both worlds. The crumbly exterior and soft, melt-in-the-mouth center create a delightful contrast that makes each bite memorable. Plus, the vibrant green chocolate chips add a visual pop that elevates the presentation.
Whether you’re an experienced baker or just starting your culinary journey, Mint Chocolate Chip Snowball Cookies are an excellent choice. They come together easily with minimal fuss, making them accessible for cooks at any skill level. So, roll up your sleeves and let’s dive into creating these delicious, minty treats!
Ingredients
- 1 cup unsalted butter, softened
Butter provides moisture and richness, giving the cookies a tender, creamy texture essential for baking. Softer butter allows for better incorporation with the sugar, resulting in a well-creamed mixture that helps the cookies develop a lightness. - 1/2 cup powdered sugar
Powdered sugar not only sweetens the cookies but also contributes to their light, delicate texture. Its fine consistency allows for easy blending, promoting a smoother batter while ensuring the cookies remain soft and crumbly. - 2 cups all-purpose flour
Flour is the backbone of any cookie, providing structure and stability. The type of flour used here ensures that the cookies maintain their shape and texture, preventing them from spreading too much during baking. - 1/4 teaspoon salt
Salt enhances the sweetness and overall flavor of baked goods. A small amount balances the sweet ingredients, preventing the cookies from tasting flat and contributing to a more complex flavor profile. - 1 teaspoon baking powder
Baking powder acts as a leavening agent, helping the cookies rise and giving them a light texture. It creates tiny bubbles during baking that expand, contributing to the fluffy quality of the finished product. - 1 teaspoon peppermint extract
Peppermint extract infuses the cookies with a refreshing minty flavor that is soothing and invigorating. Its concentrated nature means a little goes a long way, ensuring a balance between minty freshness and sweetness. - 1/2 cup chocolate chips
Chocolate chips add a delightful burst of richness and sweetness in each bite. They melt slightly during baking, creating a creamy chocolate experience that complements the mint flavor beautifully. - 1/4 cup green colored sugar, for rolling
Colored sugar provides a fun, festive touch that enhances the visual appeal of the cookies. The texture also adds a slight crunch, making each bite even more enjoyable.
Directions & Preparation
Step 1: Preheat your oven to 350°F (175°C).
Preheating your oven is crucial for baking success. It ensures that the cookies will bake evenly from the moment they hit the pan. An oven that's too cool can result in a thicker dough that doesn’t spread properly, while a very hot oven might cause the cookies to burn.
Step 2: In a large mixing bowl, cream together the softened butter and powdered sugar until light and fluffy.
Creaming the butter and sugar is an important step that incorporates air into the mixture, contributing to the cookies' light texture. Beat for several minutes until the mixture appears fluffy, and be sure to scrape down the sides of the bowl to ensure even mixing.
Step 3: Add in the peppermint extract and mix until well incorporated.
Incorporating the peppermint extract at this stage ensures that its flavor is evenly distributed throughout the dough. The mint complements the chocolate wonderfully and enhances the overall cookie experience with its aromatic qualities.
Step 4: In a separate bowl, whisk together flour, baking powder, and salt.
Whisking the dry ingredients together helps to evenly distribute the baking powder and salt throughout the flour. This step prevents any clumps and ensures that the leavening agent is proportionately mixed into the dough, allowing for consistent cookie texture.
Step 5: Gradually add the dry ingredients to the wet ingredients, mixing until just combined.
Mixing the wet and dry ingredients together gradually helps prevent overmixing, which can lead to tough cookies. Stop mixing as soon as you see no flour; this method keeps the dough tender and maintains its desired texture.
Step 6: Fold in the chocolate chips gently until evenly distributed.
Folding in the chocolate chips gently integrates them into the batter without overworking it. This method keeps the dough light and airy, ensuring that the cookies retain their desired consistency and the chocolate remains intact.
Step 7: Scoop tablespoon-sized portions of dough and roll into balls.
Rolling the dough into balls creates the signature snowball cookie shape, fostering even baking. Uniform sizes allow for consistent baking times, ensuring that all cookies come out perfectly baked and with a similar texture.
Step 8: Roll the dough balls in colored sugar before placing them on a baking sheet lined with parchment paper.
Rolling the dough balls in colored sugar not only adds an eye-catching element but also a slight crunch when bitten into. The sugar will adhere to the cookies as they bake, amplifying their festive look and sweet flavor.
Step 9: Bake for 10-12 minutes or until the edges are slightly golden.
Baking until the edges are slightly golden ensures that the insides remain soft while the outside develops just the right amount of crunch. Keep an eye on them in the last few minutes to prevent overbaking, as this can quickly turn them dry.
Step 10: Let the cookies cool on the baking sheet for 5 minutes before transferring them to a wire rack.
Allowing the cookies to cool slightly on the baking sheet helps them set up, making them easier to transfer without breaking. Moving them to a wire rack afterwards allows for effective cooling, keeping them from becoming soggy on the bottom.

The Harmony of Mint and Chocolate
Combining the flavors of mint and chocolate creates an iconic taste experience that is both refreshing and indulgent. The coolness of the mint cuts through the richness of the chocolate, making every bite feel less heavy and more balanced. This playful fusion is what makes Mint Chocolate Chip Snowball Cookies not just another cookie, but a standout treat that speaks to various palates.
Celebrating Texture: Crunchy Meets Soft
These snowball cookies are a fascinating play on texture, combining a tender and crumbly core with a lightly crisp outer layer. The contrast between the smooth melt of chocolate chips and the crunchy colored sugar coating adds depth to each bite. It's this celebration of textural variety that captures your attention and makes these cookies a delightful treat at any event or gathering.
Perfect for Gifting and Sharing
Gift-giving can often be challenging, but homemade cookies like these are always a welcome surprise. Their festive appearance and enchanting flavors make them a delightful choice for holiday gift boxes or potluck gatherings. Presenting Mint Chocolate Chip Snowball Cookies shows thoughtfulness and brings joy to anyone fortunate enough to receive them.
FAQs
What can I do if the dough is too thick?
If your dough seems too thick, you can add a teaspoon of milk or water at a time until it reaches the desired consistency. Be cautious not to overdo it, as too much liquid can alter the cookie’s texture.
Can I use dark chocolate chips instead of regular?
Absolutely! Dark chocolate chips will provide a richer flavor that pairs well with the mint. Adjust the amount to taste, as darker chocolate can be less sweet.
Why did my cookies spread too much during baking?
Excessive spreading usually results from overly warm dough or too little flour. Ensure that your butter is just softened, not melted, and measure your flour accurately.
How can I enhance the mint flavor in my cookies?
To amplify the mint flavor, try increasing the peppermint extract to 1.5 teaspoons. Additionally, consider using mint chocolate chips for an extra kick!
Conclusion
Mint Chocolate Chip Snowball Cookies are a delightful treat that captures the essence of the holidays in each bite. Their unique combination of flavors and textures not only satisfies your sweet tooth but also brings a bit of joyful festivity into your kitchen.
As you stack these cookies on a plate or share them with loved ones, remember that baking is about joy and creativity. Embrace the process, experiment with flavors, and enjoy the deliciousness that comes from your own hands.
Recipe Card
Delight with Mint Chocolate Chip Snowball Cookies
Ingredients
- 1 cup unsalted butter softened
- 1/2 cup powdered sugar
- 2 cups all-purpose flour
- 1/4 teaspoon salt
- 1 teaspoon baking powder
- 1 teaspoon peppermint extract
- 1/2 cup chocolate chips
- 1/4 cup green colored sugar for rolling
Instructions
- Preheat your oven to 350°F (175°C).
- In a large mixing bowl, cream together the softened butter and powdered sugar until light and fluffy.
- Add in the peppermint extract and mix until well incorporated.
- In a separate bowl, whisk together flour, baking powder, and salt.
- Gradually add the dry ingredients to the wet ingredients, mixing until just combined.
- Fold in the chocolate chips gently until evenly distributed.
- Scoop tablespoon-sized portions of dough and roll into balls.
- Roll the dough balls in colored sugar before placing them on a baking sheet lined with parchment paper.
- Bake for 10-12 minutes or until the edges are slightly golden.
- Let the cookies cool on the baking sheet for 5 minutes before transferring them to a wire rack.
Notes
Additional serving suggestions: pair with a crisp salad, garlic bread, or roasted seasonal vegetables for balance.
For make-ahead, prep components separately and assemble just before heating to preserve texture.
Taste and adjust with acid (lemon/vinegar) and salt right at the end to wake up flavors.