Introduction
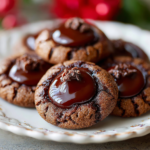
Chocolate Thumbprint Cookies are an enchanting treat that combines the richness of chocolate with a touch of nostalgia. These cookies, characterized by their signature dip in the center, are not just delicious but also visually appealing, making them perfect for any occasion.
The beauty of thumbprint cookies lies in their versatility; you can fill them with various jams or chocolate, allowing you to customize each batch to your preference. Whether it’s a cozy family gathering or a festive celebration, these cookies are sure to bring smiles to your loved ones.
Let’s dive into the world of baking these easy yet impressive cookie delights. With the right ingredients and a bit of patience, you'll create cookies that melt in your mouth and leave everyone asking for the recipe.
Ingredients
- 1 cup unsalted butter, softened
Butter adds richness and moisture to the cookies, creating a tender texture. Softened butter is crucial for proper creaming with sugar, which helps to aerate the mixture, ensuring the cookies rise nicely during baking. - 1 cup granulated sugar
Sugar not only sweetens the cookies but also contributes to their texture. Granulated sugar helps create a crispy outer layer while allowing for a chewy interior, which is essential for achieving that perfect thumbprint cookie. - 2 cups all-purpose flour
Flour provides the structure of the cookies. All-purpose flour is balanced enough to give a good chewiness while allowing the butter and sugar flavors to shine through, making it a staple in cookie recipes. - 1/2 cup unsweetened cocoa powder
Cocoa powder brings the chocolate flavor necessary for this recipe. Using unsweetened cocoa allows you to control the sweetness, while its fine texture helps blend well with the other dry ingredients. - 1/2 teaspoon baking powder
Baking powder is a leavening agent that helps the cookies rise slightly during baking. It creates a lighter texture, which is important for balancing the denser components like butter and flour. - 1/2 teaspoon salt
Salt enhances the overall flavor of the cookies. It balances the sweetness and rounds out the chocolate taste, making each bite fully satisfying. - 1 teaspoon vanilla extract
Vanilla extract adds depth to the flavor profile of the cookies. It complements the chocolate, creating a well-rounded taste that makes these cookies even more irresistible. - 1/2 cup chocolate chips or fruit preserves
The filling can either be chocolate chips, adding extra richness, or fruit preserves, which lend a tart contrast. Both options create a delightful surprise with every bite, making the thumbprint feature truly shine.
Directions & Preparation
Step 1: Preheat your oven to 350°F (175°C).
Preheating the oven is essential for achieving uniform baking. By starting with a hot oven, you ensure that the cookies begin to set as soon as they enter, helping to achieve a perfect texture.
Step 2: In a large mixing bowl, cream together the softened butter and granulated sugar until light and fluffy.
This step is critical as it incorporates air into the mixture. A light and fluffy mixture leads to cookies that have a beautiful texture. Be sure to scrape down the sides to ensure everything is blended well.
Step 3: Add the vanilla extract and mix until combined.
Incorporating the vanilla at this stage allows its flavor to distribute evenly throughout the dough. This step enhances the overall depth of flavor that complements the chocolate beautifully.
Step 4: In another bowl, whisk together the flour, cocoa powder, baking powder, and salt.
Whisking the dry ingredients separately ensures that they are well combined and evenly distributed in the dough. This prevents clumps that could affect the texture and consistency of your cookies.
Step 5: Gradually add the dry ingredients to the wet mixture, mixing until just combined.
Mixing until just combined is crucial for avoiding overworking the dough, which can result in dry cookies. You want to ensure that all flour is incorporated without developing gluten, keeping your cookies tender.
Step 6: Scoop tablespoons of dough and roll them into balls.
Forming the dough into balls is the first step in shaping the cookies. The size of the balls will determine the final cookie size, so choose a consistent scoop for even baking.
Step 7: Place the dough balls on a lined baking sheet, spaced about 2 inches apart.
Spacing the balls is vital as the cookies will spread while baking. If they are too close together, they may merge into each other, affecting their shape and final presentation.
Step 8: Use your thumb or a spoon to create a gentle indent in the center of each dough ball.
The indentation is what makes these cookies special. It will hold the filling, so ensure you make a deep enough imprint without piercing through the bottom of the cookie.
Step 9: Fill each indent with chocolate chips or fruit preserves.
Filling the indents gives your cookies that signature thumbprint look. Choose the filling based on your preference—chocolate for a rich experience or preserves for a fruity twist, ensuring each bite is flavorful.
Step 10: Bake the cookies in the preheated oven for 12-15 minutes or until they are set but still soft.
Baking time is important—overbaking will lead to dry cookies. You'll recognize they’re done when the edges are firm, but the centers still have a slight softness, so keep an eye on them towards the end of the baking time.
Step 11: Remove from the oven and allow to cool on the baking sheet for 5 minutes before transferring to a wire rack.
Cooling on the baking sheet helps the cookies firm up a bit while still warm, preventing them from breaking during transfer. After a short period, moving them to a wire rack allows for even cooling and retains their chewiness.

Experimenting with Fillings: A World of Flavor
While chocolate chips and fruit preserves are classic fillings, consider experimenting with other options. Nut butters, caramel, or even flavored ganaches can elevate these cookies to a new level. The choice of filling can alter the taste and texture, providing a delightful surprise with each bite, catering to various palates.
Tips for Perfectly Uniform Cookies
For perfectly uniform cookies, consider using a cookie scoop for consistent sizes. This tool ensures each cookie bakes evenly and looks appealing. Additionally, using a kitchen scale can further enhance accuracy, especially if you’re planning to make larger batches to share or showcase at gatherings.
Making Chocolate Thumbprints Gluten-Free
Transforming your Chocolate Thumbprint Cookies to gluten-free is easier than you might think. Simply replace the all-purpose flour with a gluten-free blend that includes xanthan gum for structure. Not only do you retain the delicious taste, but you also cater to guests with dietary restrictions without compromising on flavor.
FAQs
What if my dough feels too thick?
If the dough is too thick and hard to work with, consider adding a tablespoon of milk or water to loosen it up. This will help achieve the right consistency without compromising the cookie integrity.
Can I use almond flour instead of all-purpose flour?
Yes, you can substitute almond flour for all-purpose flour in equal amounts. However, be aware that this will result in a denser cookie with a different texture, so adjustments in baking time may be necessary.
Why did my cookies spread too much?
Overly warm dough can cause excessive spreading. Ensure your dough is well-chilled before baking or consider cooling your butter slightly more before mixing, as too much warmth changes the cookie's structure.
What can I do if my chocolate filling melted too much?
If your chocolate melted excessively, it might spread too thin in the nozzle. To avoid this, use chocolate chips instead of melting chocolate, or only slightly melt chocolate to keep its structure better during baking.
What to do if my cookies are too bland?
If you find the cookies bland, a pinch more salt or a bit more vanilla extract can amplify the flavors. Next time, consider using high-quality cocoa powder for deeper chocolate flavor.
Can these cookies be decorated after baking?
Absolutely! Once cooled, you can drizzle melted chocolate on top or sprinkle powdered sugar for an elegant finish. It’s a fun way to add a personal touch to your cookies.
Conclusion
Baking Chocolate Thumbprint Cookies is a rewarding process that yields a delectable treat for any sweet tooth. With their soft texture and flavorful fillings, they're sure to impress friends and family alike.
Now that you have this recipe in hand, let your creativity shine through. Whether you stick to traditional chocolate or explore new fillings, these cookies can be adapted and cherished in any baking repertoire.
Recipe Card
Delightful Chocolate Thumbprint Cookies for Everyone
Ingredients
- 1 cup unsalted butter softened
- 1 cup granulated sugar
- 2 cups all-purpose flour
- 1/2 cup unsweetened cocoa powder
- 1/2 teaspoon baking powder
- 1/2 teaspoon salt
- 1 teaspoon vanilla extract
- 1/2 cup chocolate chips or fruit preserves
Instructions
- Preheat your oven to 350°F (175°C).
- In a large mixing bowl, cream together the softened butter and granulated sugar until light and fluffy.
- Add the vanilla extract and mix until combined.
- In another bowl, whisk together the flour, cocoa powder, baking powder, and salt.
- Gradually add the dry ingredients to the wet mixture, mixing until just combined.
- Scoop tablespoons of dough and roll them into balls.
- Place the dough balls on a lined baking sheet, spaced about 2 inches apart.
- Use your thumb or a spoon to create a gentle indent in the center of each dough ball.
- Fill each indent with chocolate chips or fruit preserves.
- Bake the cookies in the preheated oven for 12-15 minutes or until they are set but still soft.
- Remove from the oven and allow to cool on the baking sheet for 5 minutes before transferring to a wire rack.
Notes
Additional serving suggestions: pair with a crisp salad, garlic bread, or roasted seasonal vegetables for balance.
For make-ahead, prep components separately and assemble just before heating to preserve texture.
Taste and adjust with acid (lemon/vinegar) and salt right at the end to wake up flavors.