Introduction
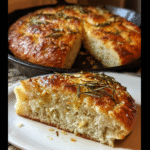
If you’re looking for an impressive yet uncomplicated addition to your next meal, look no further than rustic garlic rosemary skillet bread. This bread boasts a crispy crust and a soft, airy interior, making it a perfect accompaniment to soups, stews, or simply enjoyed on its own.
Garlic and rosemary are a classic flavor combination that elevates simple ingredients, creating a fragrant loaf that fills your home with warmth. With its rustic charm and ease of preparation, this bread is not only delicious but also a fulfilling project for both novice and experienced bakers alike.
Ingredients

- 3 cups all-purpose flour
All-purpose flour forms the backbone of this bread. It provides the necessary structure and chewiness, allowing the bread to rise and maintain its shape while producing a soft interior. - 1 tablespoon instant yeast
Instant yeast acts as the leavening agent, helping the bread rise quickly. It allows for a light and airy texture, and because it’s instant, it can be mixed directly with the flour without needing to proof beforehand. - 1 teaspoon sugar
Sugar serves a dual purpose: it provides just a hint of sweetness that enhances the overall flavor of the bread and acts as food for the yeast, promoting a more robust rise during fermentation. - 1 teaspoon salt
Salt not only enhances the flavor of the bread but also controls yeast fermentation, ensuring that the dough rises to the right level without becoming over-active. It’s a fundamental ingredient for balanced seasoning. - 1 cup warm water
Warm water is crucial for activating the yeast effectively. The right temperature helps to create an optimal environment for yeast fermentation, promoting a lighter texture and crusty exterior once baked. - 2 tablespoons olive oil
Olive oil adds richness to the bread, contributing to its soft texture. It also plays a role in the browning of the crust, giving it an appealing, rustic finish while enhancing flavor. - 4 cloves garlic, minced
Garlic infuses the bread with a pungent and aromatic flavor that transforms each bite into a culinary delight. Its natural oils release during baking, creating a warm, inviting aroma in your kitchen. - 2 tablespoons fresh rosemary, chopped
Fresh rosemary brings a distinctive, herbal note that complements the garlic beautifully. Its earthy flavor adds depth to the bread, making it truly rustic and aromatic.
Directions & Preparation
Step 1: Mix the dry ingredients together.
In a large bowl, whisk together the flour, yeast, sugar, and salt until evenly combined. This initial step is vital because it ensures that the yeast and salt are distributed uniformly, avoiding any regions of unequal yeast distribution that could lead to uneven rising.
Step 2: Combine the wet ingredients.
In a separate bowl, combine the warm water and olive oil, mixing them gently. It’s crucial that the water is warm, not hot, as too high a temperature can kill the yeast, failing to give the bread its desired rise. Ensure the water temperature is around 110°F for optimal yeast activation.
Step 3: Incorporate the wet ingredients into the dry.
Pour the wet mixture into the dry ingredients, and stir until a shaggy dough forms. At this point, you may notice the dough is sticky, which is normal. This part of the process encourages the flour to absorb moisture, creating the gluten structure essential for texture.
Step 4: Add garlic and rosemary.
Fold in the minced garlic and chopped rosemary into the dough. This addition is crucial because it evenly distributes the flavors throughout, ensuring that every bite carries that beautiful garlic and herby essence, making your bread burst with freshness.
Step 5: Knead the dough.
Transfer the dough to a floured surface and knead for about 8-10 minutes, until smooth and elastic. Kneading is essential as it develops the gluten network that provides the bread with strength and chewiness, resulting in the perfect texture when baked.
Step 6: Let the dough rise.
Place the kneaded dough into a lightly oiled bowl, cover it with a damp cloth, and allow it to rise in a warm place for about 1 hour, or until doubled in size. This step is important as it allows the yeast to work, producing gas that causes the dough to expand, ensuring a light and airy bread.
Step 7: Preheat the skillet.
While the dough is rising, place a cast-iron skillet in the oven and preheat it to 475°F. Preheating the skillet is crucial as it contributes to a crispy crust from the moment the dough hits the pan, giving it that rustic characteristic.
Step 8: Shape the dough.
Once the dough has risen, gently punch it down to release gases and transfer it onto a floured surface. Shape it into a round loaf, trying not to deflate it too much. This shaping step helps create surface tension, which promotes a better rise in the oven.
Step 9: Transfer to the skillet.
Carefully remove the hot skillet from the oven and place the shaped dough in the center. The sizzle you hear when placing the dough will start the cooking process immediately, setting the stage for a perfectly baked bread with a golden crust.
Step 10: Bake the bread.
Cover the skillet with a lid or foil and bake for 20 minutes. This initial covered cooking traps steam, which helps the dough rise further. After 20 minutes, remove the lid or foil and bake for an additional 15-20 minutes until golden brown. This browning enhances the flavor and results in that beautiful crust.
Step 11: Cool and enjoy.
Once baked, carefully remove the skillet from the oven and transfer the bread to a wire rack to cool slightly. Allowing it to cool helps avoid a gummy texture inside. Slice and enjoy warm, ideally with a drizzle of olive oil or your favorite dipping sauce.
Why Choose Skillet Bread?
Skillet bread offers a unique and rustic twist to the traditional loaf. Baking in a skillet creates a superior crust thanks to the heat retention properties of cast iron, allowing for even cooking. This method is not only practical but also grants a stunning presentation. Plus, the skillet is a versatile choice, easily transitioning from stovetop heating to oven baking, ensuring perfectly cooked bread in one vessel.
Flavorful Additions and Variations
While garlic and rosemary are a classic combination, this rustic bread serves as a canvas for your creativity. Consider adding sun-dried tomatoes, black olives, or even a sprinkle of cheese to enhance its flavor profile. You can also experiment with different herbs, such as thyme or oregano, to personalize your skillet bread, creating a loaf tailored to your taste preferences.
Serving Suggestions
Rustic garlic rosemary skillet bread is not just a side but a centerpiece. Pair it with hearty soups, stews, or salads to create a balanced meal. It also shines when served with a platter of charcuterie or as a base for bruschetta. The lovely aroma and texture make it an inviting option for gatherings, ensuring your guests will remember your thoughtful touch.
FAQs
What if my dough is too sticky?
If your dough is too sticky to handle, try adding a little more flour, a tablespoon at a time, until it reaches a workable consistency. Just be cautious not to add too much, as it can alter the bread’s texture.
Can I scale down the recipe for smaller servings?
Absolutely! You can halve the recipe easily. Simply divide all the ingredient quantities by two, and follow the same directions. Note that baking time may vary slightly, so keep an eye on your bread as it cooks.
What if I want to add different herbs?
Feel free to experiment with the herbs to suit your taste! Thyme, oregano, or even dill could be great substitutes for rosemary. Just use a similar quantity to keep the flavor balanced.
Can I use whole wheat flour?
Yes, you can use whole wheat flour; however, you might need to adjust the liquid by adding a bit more water to achieve the right dough consistency. Whole wheat flour may yield a denser loaf but with a hearty flavor.
What if my bread is overcooked?
If your bread turns out overcooked, it can be dried out. In the future, keep an eye on the baking time, checking for a golden color and hollow sound when tapping the bottom. Consider lowering the temperature slightly for a more even bake.
Can I make this bread gluten-free?
You can try using a gluten-free flour blend designed for baking. However, the texture may vary, and additional binding agents such as xanthan gum may be needed to help with structure.
Conclusion
Delicious rustic garlic rosemary skillet bread is a rewarding project that brings a taste of homemade goodness to your table. Its savory aroma and satisfying texture make it a perfect companion for any meal.
Embrace the joy of baking and explore different variations to suit your palate. With this recipe in your repertoire, you’ll always have an impressive, flavorful bread ready to serve.
Recipe Card
Rustic Garlic Rosemary Skillet Bread Recipe
Ingredients
- 3 cups all-purpose flour
- 1 tablespoon instant yeast
- 1 teaspoon sugar
- 1 teaspoon salt
- 1 cup warm water
- 2 tablespoons olive oil
- 4 cloves garlic minced
- 2 tablespoons fresh rosemary chopped
Instructions
- Mix the dry ingredients together.
- Combine the wet ingredients.
- Incorporate the wet ingredients into the dry.
- Add garlic and rosemary.
- Knead the dough.
- Let the dough rise.
- Preheat the skillet.
- Shape the dough.
- Transfer to the skillet.
- Bake the bread.
- Cool and enjoy.
Notes
Additional serving suggestions: pair with a crisp salad, garlic bread, or roasted seasonal vegetables for balance.
For make-ahead, prep components separately and assemble just before heating to preserve texture.
Taste and adjust with acid (lemon/vinegar) and salt right at the end to wake up flavors.