Introduction
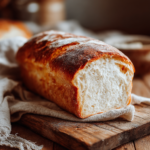
There's something truly magical about the aroma of freshly baked bread wafting through your home. White bread, in particular, has a warm, nostalgic quality that connects many of us to cherished memories of family gatherings and comforting meals.
Baking white bread from scratch allows you to control ingredients and create a loaf that's soft, fluffy, and simply irresistible. This article will take you through the essentials of crafting your perfect white bread, ensuring that every slice will be a delight.
Ingredients
- 4 cups all-purpose flour
All-purpose flour forms the backbone of this bread, providing the necessary structure and chew. Its gluten content allows the dough to rise, creating that desired fluffy texture. - 1 packet (2 1/4 teaspoons) active dry yeast
Yeast is the magical ingredient that ferments and causes the bread to rise. Active dry yeast needs to be activated in warm water before adding, ensuring it works effectively. - 1 1/2 cups warm water (about 110°F)
Warm water is essential for activating the yeast. Too hot can kill the yeast, while too cold will not activate it, leading to poor rising. - 2 tablespoons sugar
Sugar not only feeds the yeast, promoting fermentation, but also adds a touch of sweetness that enhances the bread's flavor. - 2 tablespoons salt
Salt is crucial for flavor enhancement but also helps to strengthen the gluten structure. However, adding it directly to yeast can inhibit the fermentation process, so timing is key. - 2 tablespoons unsalted butter, melted
Butter adds richness and flavor to the bread, making it softer. It contributes to the overall tenderness of the loaf, allowing for a delightful mouthfeel.
Directions & Preparation
Step 1: Activate the yeast
Start by placing the active dry yeast in a bowl with warm water and sugar. Allow this mixture to sit for about 5-10 minutes until frothy. This step is crucial because it verifies that your yeast is alive and ready to do its job, ensuring a good rise.
Step 2: Mix the dry ingredients
In a large mixing bowl, whisk together the flour and salt. This ensures the salt is evenly distributed throughout the flour, which is important for consistent flavor and the proper development of gluten stretch.
Step 3: Combine the wet and dry ingredients
Once the yeast mixture is frothy, pour it into the flour along with the melted butter. Mix until a cohesive dough forms. This is when the ingredients begin to come together, creating the foundation for your bread.
Step 4: Knead the dough
Transfer the dough to a lightly floured surface and knead for about 10 minutes until smooth and elastic. Kneading develops the gluten, which gives the bread its structure, ensuring it can rise and hold its shape.
Step 5: First rise
Place the dough in a greased bowl, cover it with a damp cloth, and let it rise in a warm place for about 1-2 hours, or until doubled. This is when fermentation occurs, allowing the yeast to create air pockets for a light texture.
Step 6: Shape the dough
Once risen, gently punch the dough down to release excess air. Shape it into a loaf, tucking in the edges for a uniform shape. Proper shaping is crucial to create tension on the surface, leading to a better rise when baked.
Step 7: Second rise
Place the shaped dough in a greased loaf pan and cover it again to rise for another 30-45 minutes until puffed. This final rise allows the dough to expand, resulting in a soft, fluffy loaf.
Step 8: Preheat the oven
While the dough is rising, preheat your oven to 375°F (190°C). This ensures the bread is placed in a hot environment, which is important for oven spring during baking.
Step 9: Bake the bread
Bake the loaf for 25-30 minutes or until golden brown and sounds hollow when tapped. Proper baking is essential for achieving that perfect crust and ensuring the bread is fully cooked.
Step 10: Cool the bread
Once baked, remove the bread from the oven and let it cool in the pan for a few minutes before transferring to a wire rack. Cooling allows the steam to escape, preventing sogginess and ensuring a firm texture.

Exploring Flour Variations for Unique Flavors
While this recipe uses all-purpose flour, experimenting with other flours like bread flour or whole wheat can add depth and character to your white bread. Each type of flour brings a slightly different protein content, impacting the bread's texture and flavor. It's worthwhile to explore these variations for a personalized loaf.
The Importance of Water Temperature
Water temperature can greatly affect yeast activation. Using a thermometer is recommended to avoid hot or cold water that can hinder the process. Aim for water between 100°F and 110°F, as this is ideal for yeast development, creating a perfect environment for a successful rise.
Creating the Perfect Crust
If you prefer a crustier loaf, you can add a small pan of water to the oven while baking. This creates steam, which results in a shiny crust. Alternatively, baking the bread directly on a preheated baking stone can also enhance crispiness, elevating your homemade white bread to a bakery-quality treat.
FAQs
What should I do if my bread is too dense?
Dense bread often results from insufficient kneading or not enough time for the yeast to rise. Make sure you're kneading effectively to develop the gluten and ensure adequate rising time.
Can I use whole wheat flour partially?
Yes, you can substitute part of the all-purpose flour with whole wheat flour. Keep in mind that this will change the texture and flavor, requiring slightly more water to achieve the right dough consistency.
Why did my bread not rise?
If the dough doesn't rise, it could be due to expired yeast or water that was either too hot or too cold. Always check the yeast for freshness and use warm water around 110°F to activate properly.
How can I ensure my crust is soft?
For a softer crust, brush the loaf with melted butter immediately after baking, and consider covering it with a cloth while cooling to trap moisture.
What if my dough is too sticky?
If your dough is too sticky to handle, sprinkle in small amounts of flour until you achieve the right consistency. Avoid adding too much at once to prevent the bread from becoming dense.
How can I adjust the recipe for a smaller loaf?
To create a smaller loaf, you can halve all the ingredients while maintaining the same ratios. Just be sure to monitor the bake time as it may reduce.
Conclusion
Baking white bread at home can seem intimidating, but with patience and practice, you'll find joy in the process. Each loaf is a personal journey, from measuring ingredients to savoring the warm aroma as it bakes.
The satisfaction that comes from slicing into a freshly baked loaf is unmatched. Whether enjoyed with butter, used for sandwiches, or savored on its own, your homemade white bread will surely become a family favorite.
Recipe Card
The Joy of Baking Homemade White Bread
Ingredients
- 4 cups all-purpose flour
- 1 packet 2 1/4 teaspoons active dry yeast
- 1 1/2 cups warm water about 110°F
- 2 tablespoons sugar
- 2 tablespoons salt
- 2 tablespoons unsalted butter melted
Instructions
- Activate the yeast
- Mix the dry ingredients
- Combine the wet and dry ingredients
- Knead the dough
- First rise
- Shape the dough
- Second rise
- Preheat the oven
- Bake the bread
- Cool the bread
Notes
Additional serving suggestions: pair with a crisp salad, garlic bread, or roasted seasonal vegetables for balance.
For make-ahead, prep components separately and assemble just before heating to preserve texture.
Taste and adjust with acid (lemon/vinegar) and salt right at the end to wake up flavors.